In the last two parts of the On-Premise 101 series, I showed you how to provision and bootstrap a full Kubernetes cluster. Now, I’m tearing part of it down and rebuilding the entire workflow. Why? The project’s goal was always automation, but I hit a wall. The manual steps to set up that automation - like managing secrets and SSH keys - became a huge liability.
So, before I show you how to deploy applications on that cluster, I’m pivoting. I’ve decided to migrate the whole project to use GitHub Actions for CI/CD and HashiCorp Vault for secrets. The idea was simple: push code, run automation in a repeatable environment, fetch secrets from a central server, and never bake a long-lived credential into the repo.
While that sounds great in theory, implementing it was harder than it sounded. Way harder.
However, after a couple of days of wrestling with HashiCorp Vault, I’m ready to share my design. In this post, I’ll show you my Vault setup, how GitHub Actions authenticates without static tokens, the new Terraform/Ansible SSH flow, and the operational lessons I learned. This is the foundation of a Zero-Trust design.
In case anyone haven’t read it, here’s my blog post on the previous version of the project
In my previous setup, I manually managed secrets. SSH keys were on my local machine, and other credentials were scattered in config files, all carefully managed with .gitignore. This seemed fine… until my admin laptop died a few weeks ago.
Suddenly, I was completely locked out of my own cluster and had to re-bootstrap the entire thing. That single point of failure was a wake-up call.
This failure highlighted other problems, too. When reproducing the dev and prod environments, I’d hit issues like “that one box had a different key” or “I forgot to update the inventory.” And what if I wanted to collaborate? I’d have to hand out my static SSH keys. If that person left the project, how could I be sure they wouldn’t access my cluster again?
That experience changed my thinking from “How do I stop losing keys?” to “How do I design a system where one mistake doesn’t burn everything down?” Zero Trust became that guiding mindset.
By definition, Zero Trust assumes nothing is trusted by default. Every request, credential, and runner must prove who they are. Think less “giving someone a copy of the master key” and more “a bouncer who checks your ID every time you try to get in.” That bouncer doesn’t rely on a single badge that could be copied; they verify identity, scope, and time.
In contrast, the traditional model is fragile: bake a bunch of static credentials into CI/CD configs, hand out long-lived keys, and hope you rotate them before they leak. When a leak does happen, it’s hard to trace. With Zero Trust, you flip the model: authenticate identities, minimize privileges, and shrink the lifetime of credentials so a leak is both noisy and short-lived.
Never trust, always verify:GitHub Actions authenticates to Vault (using OIDC/JWT in our case), and Vault validates the token’s claims before issuing anything. It requests dynamic tokens, not hard-coded secrets.
Least privilege: Vault policies are explicit. Roles can only read the paths they need. A runner for the dev environment cannot read prod/* secrets, even if it somehow gets a token.
Short-lived credentials: Signed SSH certificates and temporary Vault tokens mean credentials expire quickly, reducing the blast radius. Once a job finishes, the environment is destroyed, limiting the persistence of any secret material.
Centralized control and audit logging: Vault is the single source of truth for secrets and logs every access. If a leak happens, you can easily identify the source and mitigate it.
A fair question. For a small homelab, you could store a few secrets in GitHub and be done. The tradeoffs are:
Any repo collaborator with write permissions can add a workflow to exfiltrate secrets.
Static secrets are long-lived unless you rotate them; rotation is manual and error-prone.
Policies, CA signing, and TTLs are hard to model in GitHub alone.
Vault gives you fine-grained policies, TTLs, and an auditable central place for secrets. The only secret I now store in GitHub is my Tailscale credential, which lets the GitHub Actions runner access my homelab network to talk with Vault and the rest of the infrastructure. (You might not even need this if you run a self-hosted runner, but I prefer Tailscale because I get to use the free compute resources GitHub provides :D).
This mindset directly addressed my prior pain. Instead of juggling SSH keys across machines and wondering which config file held a password, I’m now designing flows that assume compromise is possible and make it costly for an attacker. That philosophical shift - designing for minimal trust and minimal time windows - sets the foundation for the concrete Terraform and Ansible flows I’ll describe next.
It’s not simple to just spin up a Vault server, plug it into GitHub Actions, and call it a day. At first, I planned to use Terraform to automate my Vault setup - after all, Vault is infrastructure, and I want to automate its provisioning.
However, I immediately ran into a classic “chicken-and-egg” problem. Actually, two of them:
The Backend Deadlock: My main Terraform project uses Minio (S3) for its remote state. It needs to fetch Minio credentials from Vault just to initialize. But how can it fetch secrets from Vault before it’s even initialized?
The Auth Deadlock: I want GitHub Actions to run that Terraform code. But for that, the runner needs to authenticate to Vault using OIDC. Someone has to set up that OIDC auth method and role in Vault first. My GitHub runner can’t configure its own access if it can’t log in.
Therefore, my solution was to split responsibilities into two distinct Terraform projects:
terraform-admin: This is the foundation, run once from your local machine. It bootstraps Vault, configures auth methods (like OIDC for GitHub), sets up core policies, seeds initial secrets, and configures the SSH Certificate Authority (CA).
terraform-provision: This is the main CI/CD project, run by GitHub Actions. It authenticates to the now-configured Vault, fetches the secrets and certs it needs, and then provisions the actual infrastructure (Proxmox VMs, networking, etc.) before handing off to Ansible.
Think of terraform-admin as the one-time, manual step to build and secure the “secrets vault” itself. Once that’s done, terraform-provision is the fully automated workflow that just uses the vault.
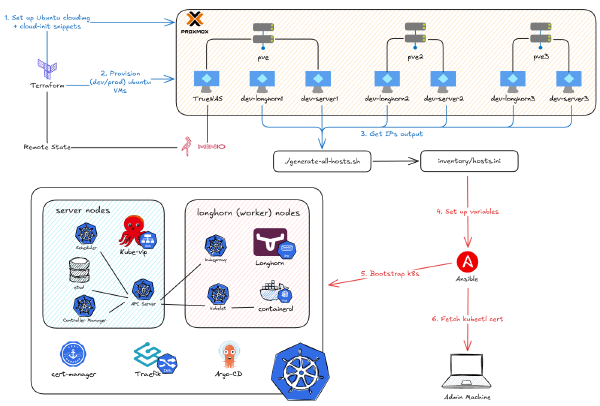
At a glance, the new workflow looks like this:
There are a few other pieces worth calling out:
Tailscale: This creates a secure network path for the GitHub runner to access Vault and Proxmox, since the runner isn’t on my local LAN.
SSH Certificate Authority (Vault): We’re now signing short-lived client certificates for SSH access. This completely replaces the need to manage static authorized_keys files on servers.
Shared Secrets: A small set of secrets (like my Cloudflare API key) are stored in a shared/ path in Vault, accessed by CI jobs with very strict policies.
With that background, let’s dive into how to implement this.
Since my terraform-admin project needs secrets (like Minio credentials) just to initialize its remote state, the Vault server has to exist before the admin automation can run.
This means I need to manually set up the Vault server and seed it with those critical, first-step secrets. Only then can I run terraform-admin to automate setting up all the other policies, auth methods, and engines.
Here’s the manual bootstrap process:
Deploy Vault as a container (Docker Compose) on a dedicated VM in my Proxmox cluster.
Initialize (unseal) Vault and securely store the initial root token and unseal keys.
Design the secret structure and manually populate the absolute minimum critical secrets (like the Minio credentials) via the Vault UI.
Run terraform-admin (which can now fetch the Minio credentials) to automate the rest.
Best practice would be to run Vault on Kubernetes, but I wanted to get this working with my project first. I decided to run Vault as a Docker container using docker-compose. It’s simple, reproducible, and I can easily migrate to a K8s deployment later.
The Vault configuration lives in ./config/local.hcl and is mounted into the container.
config/local.hcl
# Configure the 'file' storage backend
storage"file" {
path="/vault/file"}# Configure the listener
listener"tcp" {
address="0.0.0.0:8200" tls_disable=true}# Add the api_addr to prevent warnings
api_addr="http://192.168.1.10:8200" # Use your VM's static IP
# Other settings
ui=truedisable_mlock=false
A few key decisions here:
TLS is disabled: This is because I run a separate Nginx reverse proxy in front of Vault to handle all TLS termination.
File storage backend: This is perfectly fine for a single-node homelab. It’s simple, and the data at rest is still encrypted by Vault.
cap_add: IPC_LOCK: This is critical. It allows Vault to lock its process memory (mlock) and prevents the operating system from swapping sensitive secrets to disk.
When Vault starts for the first time, you have to initialize it. This process creates the master encryption key, splits it into “unseal keys” (using Shamir’s Secret Sharing), and generates the initial root token.
There are two common approaches:
Approach 1: The Solo Homelab (What I Use)
Key shares: 1
Key threshold: 1
Result: This gives you one unseal key and one root token. It’s the easiest to manage for a personal project, but you are 100% responsible for storing that one unseal key safely.
Approach 2: The High-Security Team
Key shares: 5
Key threshold: 3
Result: Vault creates 5 unique key shares, and any 3 of them are required to unseal. This prevents any single operator from having full control and is resilient if two people are on vacation.
Designing the Secrets Structure (Environment-First)#
Early on, I made the mistake of organizing secrets by tool (e.g., terraform/dev, ansible/dev). I quickly found it’s much easier to reason about policies and blast radius when secrets are grouped by environment first:
This “environment-first” design has two huge benefits:
Least-Privilege Policies: It’s straightforward to write policies that map to this structure. For example, a dev policy can be allowed read access to kv/data/dev/* and kv/data/shared/* but be explicitly denied from kv/data/prod/*.
Blast Radius: If a dev pipeline or runner is compromised, it simply cannot read production secrets.
I populate these initial, critical secrets manually via the Vault UI. From that point on, I can use the Vault CLI to log in, fetch those Minio credentials, and let terraform-admin automate everything else.
This is where terraform-admin earns its keep. It bootstraps the critical Vault components that GitHub Actions will rely on. The goal is a true Zero-Trust workflow:
Runners prove who they are using short-lived JWTs (OIDC).
They get only the secrets they need via environment-specific policies.
They get ephemeral SSH access by requesting temporary certificates from Vault’s CA.
Creating Policies and JWT/OIDC Auth for GitHub Actions#
Environment-specific policies (dev-policy, prod-policy) that can only read their own kv paths.
A shared-policy for common, cross-environment secrets (like Cloudflare or Minio keys).
A single JWT/OIDC auth backend that trusts GitHub’s OIDC provider.
JWT roles that map a specific GitHub repo, branch, or PR to a set of Vault policies.
This diagram shows the authentication flow when a GitHub Actions runner starts:
The runner asks GitHub’s OIDC provider for a short-lived JWT.
The provider, validating the runner’s context, issues a signed JWT.
The runner presents this JWT to Vault’s JWT auth backend.
Vault validates the JWT’s signature against GitHub’s public keys and checks the token’s claims (like issuer, audience, and sub for the repo/branch) against the bound_claims configured in the Vault role.
If everything matches, Vault mints a temporary Vault token that has the correct policies attached.
The runner now uses this short-lived Vault token to read secrets and request SSH certificates.
First, in the root main.tf, we enable a shared JWT auth backend that only trusts tokens from GitHub Actions.
# Shared JWT Auth Backend (used by both dev and prod)
resource"vault_jwt_auth_backend" "jwt" {
path="jwt" bound_issuer="https://token.actions.githubusercontent.com" oidc_discovery_url="https://token.actions.githubusercontent.com"}
What this does:
bound_issuer: Tells Vault to only accept tokens issued by token.actions.githubusercontent.com.
oidc_discovery_url: The URL where Vault can fetch GitHub’s public keys to verify the JWT signatures.
A Debugging War Story: We must share this backend and, crucially, it must be mounted at the path jwt. I spent hours debugging this because I first tried a custom path (github-oidc).
It turns out the official hashicorp/vault-action plugin is hard-coded to use the default jwt path.
My GitHub Action was sending login attempts to:.../v1/auth/jwt/login
My Vault roles were configured and waiting at:.../v1/auth/github-oidc/login
Vault was correctly rejecting the login at the jwt path because there were no roles there. Save yourself the headache: just use path = "jwt".
Next, we define a small shared policy for credentials used across environments (like the Cloudflare API key or Minio admin creds).
# Shared Policy (used by both dev and prod)
resource"vault_policy" "shared_policy" {
name="shared-policy" policy=<<-EOT # Shared policy
path"kv/shared/data/*" {
capabilities=["read", "list"] }
EOT}
Now, we use a module to create the environment-specific configurations. This keeps the behavior consistent for dev and prod.
Diving into the module, this is where we create the roles that bind a GitHub Action run to a set of policies. We create two roles: one for push events and one for pull requests.
role_name: A unique name, like dev-github-actions-push-role.
token_policies: Important. It attaches both the environment-specific policy (dev-policy) and the shared-policy.
bound_audiences: Must match the JWT’s aud claim.
bound_claims: Critical security control. It constrains the JWT sub (subject) claim. Only tokens minted for this exactrepo:org/repo:ref:refs/heads/branch string can use this role.
user_claim: Maps the JWT actor (the GitHub user who triggered the run) to the Vault identity for auditing.
A second role for pull requests looks similar but accepts pull_request subjects.
Why separate PR and push roles? You could use different policies, for example, giving PRs read-only access for terraform plan jobs. But to be honest, I initially wanted to group them and couldn’t find a clean way to do it, so separate roles it is.
Here’s the environment-specific policy referenced in token_policies.
# Environment-specific Vault Policy
resource"vault_policy" "vault_env_policy" {
name="${var.env}-policy" policy=<<-EOTpath"kv/${var.env}/data/*" {
capabilities=["read", "list"] } # Grant permission to sign keys using a specific role
path"${vault_mount.ssh_client_signer.path}/sign/github-runner" {
capabilities=["update"] }
EOT}
This policy does two things:
Creates dev-policy or prod-policy that only allows reading from its ownkv path (e.g., kv/dev/data/*). This enforces true isolation.
It grants permission for the runner to request an SSH certificate from the SSH engine. Let’s talk about that next.
In the previous project, I configured terraform-provision to inject my static, local public SSH key into the VM using cloud-init. This was necessary for Ansible to connect.
When porting to GitHub Actions, keeping a long-lived SSH private key in GitHub Secrets is a huge risk.
The solution is to use Vault’s SSH engine as a Certificate Authority (CA). The runners will generate a new, ephemeral SSH key for each job, ask Vault to sign the public key, and then use that short-lived certificate to log in. The VMs will be configured to trust any certificate signed by our Vault CA.
This flow is far more secure:
During provisioning (terraform-provision), the Vault CA’s public key is injected into each VM’s cloud-init config. sshd is told to trust this CA.
During a workflow run, the GitHub runner generates a fresh SSH keypair.
The runner authenticates to Vault (using its JWT, as described above) and asks Vault to sign its new public key.
Vault verifies the runner’s token and policies, then signs the key, returning a certificate valid for a short TTL (e.g., 30 minutes).
The runner uses its private key + the signed certificate to run Ansible. Once the TTL expires, the certificate is useless.
First, we mount an SSH secrets engine for each environment.
# SSH Client Signer Mount
resource"vault_mount" "ssh_client_signer" {
type="ssh" path="${var.env}-ssh-client-signer"}
Next, we tell Vault to generate a CA keypair on that engine. The private key never leaves Vault.
# SSH CA Configuration
resource"vault_ssh_secret_backend_ca" "ssh_ca" {
backend=vault_mount.ssh_client_signer.path generate_signing_key=true}
This next part is the critical handoff to terraform-provision. We store the CA’s public key in a K/V secret of the Vault server. The terraform-provision project, when run on Github Actions, will read this secret and inject it into cloud-init.
# Store SSH CA Public Key
resource"vault_generic_secret" "ssh_ca_public_key" {
path="kv/${var.env}/ssh_ca_public_key" data_json=jsonencode({
public_key=vault_ssh_secret_backend_ca.ssh_ca.public_key })}
Finally, we define the signing role that the GitHub runners will use. This role, github-runner, is what the JWT-authenticated token is allowed to access.
key_type = "ca": Indicates we want Vault to sign client keys using its CA.
allow_user_certificates = true: We are signing certificates for users (clients), not hosts.
allowed_users = "ubuntu": A key security constraint. The resulting certificate will only be valid for logging in as the ubuntu user, which helps reduce privilege escalation.
ttl = "1800": The certificate expires after 30 minutes, ensuring access is ephemeral.
# SSH Role for GitHub Runner
resource"vault_ssh_secret_backend_role" "github_runner" {
backend=vault_mount.ssh_client_signer.path name="github-runner" key_type="ca" allow_user_certificates=true allowed_users="ubuntu" ttl="1800" # 30 minutes
}
In the GitHub Actions workflow, the runner will perform these steps for every job:
# 1. Generate a new, ephemeral keypair for this jobssh-keygen -t rsa -b 4096 -f ./runner_key -q -N ""# 2. Ask Vault to sign the new public keyvault write -field=signed_key dev-ssh-client-signer/sign/github-runner \
public_key=@./runner_key.pub \
valid_principals="ubuntu" > runner_key-cert.pub
Ansible then uses this keypair (runner_key and runner_key-cert.pub) to connect. The remote VM verifies the certificate, checks that it was signed by the trusted Vault CA (the public key we injected via cloud-init), and grants access.
This is where all the pieces click together. Remember that environment-specific policy (dev-policy) from before? It had this path:
Without that permission, the runner’s JWT-authed token would be valid but powerless to request a certificate. This is the perfect example of how the JWT auth role (who the runner is), the policy (what the runner can do), and the SSH engine (the action itself) work together to provide short-lived, auditable, and secure access.
To run this, we need a provider.tf for the terraform-admin project itself.
# provider.tf
terraform {
required_version= ">=1.6.6"required_providers {
vault= {
source="hashicorp/vault" version="5.0.0" }
}
backend"s3" {
bucket="terraform" key="admin.tfstate" region="us-east-1" endpoints= {
s3="http://10.69.1.102:9000" }
skip_credentials_validation=true skip_metadata_api_check=true skip_region_validation=true skip_requesting_account_id=true use_path_style=true }
}
provider"vault" { # The Vault address and token must be set in the VAULT_ADDR and VAULT_TOKEN environment variable.
}
The S3 backend (Minio) stores the state for this admin project. This is why we had to manually create the Minio secrets in Vault first.
We’ll fetch those Minio credentials and export them as AWS_ACCESS_KEY_ID / AWS_SECRET_ACCESS_KEY so Terraform can initialize.
The Vault provider reads VAULT_ADDR and your initial VAULT_TOKEN (the root token) from the environment.
# Written in Nushell, adjust for Bash if needed# 1. Set Vault connection details (use your root token for this first run)$env.VAULT_ADDR ="https://vault.home.phuchoang.sbs"$env.VAULT_TOKEN ="<your-initial-root-token>"# 2. Fetch Minio creds for the Terraform backend$env.AWS_ACCESS_KEY_ID =(vault kv get -field=access_key kv/shared/minio)$env.AWS_SECRET_ACCESS_KEY =(vault kv get -field=secret_key kv/shared/minio)# 3. Run terraform-admin (only needs to be run once)cd terraform-admin
terraform init
terraform apply
After applying, your Vault is fully configured. The JWT auth backend is enabled, policies are created, and the SSH CAs are generated and have their public keys ready for terraform-provision to consume.
At this point, your Vault server is fully operational and configured with everything needed for a Zero Trust automation workflow:
JWT/OIDC authentication is enabled and waiting for GitHub Actions runners to prove their identity.
Environment-specific policies ensure dev and prod are completely isolated.
SSH Certificate Authorities are ready to sign ephemeral keys for secure VM access.
Secrets are organized by environment and ready to be consumed.
This foundation makes the entire automation workflow possible. Without it, we’d be back to storing long-lived credentials in GitHub Secrets or scattering SSH keys across machines.
In the next post, I’ll show you how GitHub Actions uses this Vault setup to:
Authenticate without storing any static tokens
Provision VMs on Proxmox using Terraform
Bootstrap a Kubernetes cluster using Ansible with ephemeral SSH certificates
Run the entire workflow automatically on every push to master
The hard part is done. Now it’s time to see it in action.
Hashicorp Vault -
This article is part of a series.
I’m the kind of person who will happily spend 10 hours building an automation script just to save 10 minutes of manual work every day. If that sounds like you, you’re in the right place.
People are often scared to learn Kubernetes because it’s difficult to set up an environment to play around with. Sure, you can use a project like minikube to learn on your own, but running it on your laptop seems limited, and you may not get to experience all the awesome features Kubernetes offers (remember, it was born for high availability). Or, if you have money, you can use a managed Kubernetes cluster from one of the cloud providers. Often, they’ve abstracted away so many things under the hood that you only need to learn kubectl and you’re good to go.