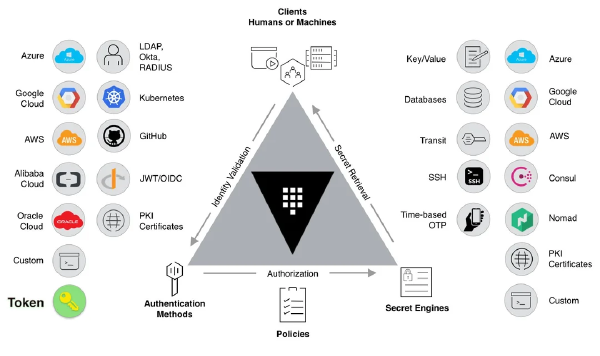
This is Part 2 of the Hashicorp Vault series. Part 1 covered bootstrapping and configuring HashiCorp Vault (the one-time terraform-admin work) and the design goals for Zero Trust secrets management.
With Vault configured and the auth roles in place, it’s time to wire up the CI/CD pipeline. The workflows in .github/workflows will authenticate to Vault, fetch secrets, and then provision and configure the infrastructure.

I have two main workflows:
lint.yml: Runs cheap and fast quality checks (Terraform fmt, Ansible lint) on every PR.terraform-ansible.yml: The main pipeline that provisions and bootstraps the cluster.
But first, there’s a problem to solve. GitHub-hosted runners are ephemeral and live on GitHub’s network. They can’t reach the private IPs (10.69.x.x) in my homelab. As mentioned earlier, I use Tailscale to solve this.
Setting Up Tailscale for Secure Network Access#
If you want to read more about my homelab network setup, you can read it here
My entire homelab is on a Tailscale network, a zero-config WireGuard-based mesh VPN. This setup allows a GitHub runner to join my network as an ephemeral node for the duration of a job and get direct access to my private IPs. When the job ends, the node disappears. You can even use Tailscale’s ACLs to limit the IP range this node can access.
Here’s how to set it up:
- Create a
tag: Create at least one tag for your ephemeral nodes, for example,tag:ci. The access permissions you grant to this tag will apply to all nodes created by the workflow.

- Set up an OAuth client: Follow the guide to set up a Tailscale OAuth client. You will need the Client ID and Client secret.

- Create GitHub Secrets: Create two repository secrets,
TS_OAUTH_CLIENT_IDandTS_OAUTH_SECRET, with the values from the previous step.Note: It’s worth mentioning that these are the only static, long-lived secrets I store in GitHub. Everything else is fetched dynamically from Vault.

- Add to workflow: In your GitHub Actions workflow, use the official Tailscale action.
- name: Tailscale
  uses: tailscale/github-action@v4
  with:
	oauth-client-id: ${{ secrets.TS_OAUTH_CLIENT_ID }}
	oauth-secret: ${{ secrets.TS_OAUTH_SECRET }}
	tags: tag:ci
What this step will do:
- It authenticates using short-lived OAuth credentials, not a long-lived auth key.
tags: tag:cilabels the new ephemeral node so my network ACLs can be applied.- This step must run before any job step that needs to talk to Vault or Proxmox.

Setting Up Linting for Code Quality#
Migrating to GitHub Actions also unlocked an easy win: automated linting. Linting is cheap, pays off immediately, and gives fast feedback on every pull request by catching syntax and formatting errors before they get merged.
This repo runs two parallel lint jobs: one for Terraform and one for Ansible.
Terraform Lint Job (excerpt from .github/workflows/lint.yml):
terraform-lint:
  name: Terraform Lint
  runs-on: ubuntu-latest
  defaults:
    run:
      working-directory: ./terraform-provision
  steps:
    - name: Checkout
      uses: actions/checkout@v4

    - name: Setup Terraform
      uses: hashicorp/setup-terraform@v3
      with:
        terraform_version: 1.6.6

    - name: Terraform Init
      run: terraform init -backend=false

    - name: Terraform Format Check
      run: terraform fmt -check -recursive

    - name: Terraform Validate
      run: terraform validate
Ansible Lint Job (excerpt):
ansible-lint:
  name: Ansible Lint
  runs-on: ubuntu-latest
  defaults:
    run:
      working-directory: ./ansible
  steps:
    - name: Checkout
      uses: actions/checkout@v4

    - name: Set up Python
      uses: actions/setup-python@v5
      with:
        python-version: "3.13"

    - name: Install ansible-lint
      run: pip install ansible-lint

    - name: Install Ansible collections
      run: ansible-galaxy install -r requirements.yml

    - name: Run ansible-lint
      run: ansible-lint
Finally, I use a path-based trigger to keep these lint jobs focused. They only run when infrastructure, playbook, or workflow files change, which saves CI minutes.
on:
  pull_request:
    paths:
      - "terraform-admin/**"
      - "terraform-provision/**"
      - "ansible/**"
      - ".github/workflows/lint.yml"
      - ".github/workflows/terraform-ansible.yml"
The result is an immediate status check on your PR. You can’t merge until linting passes, which forces clean commits.

Setting Up the Terraform Workflow#
Now for the main event: the workflow that provisions VMs on Proxmox. This pipeline plans on pull requests and applies on pushes to the master branch. All secrets are fetched dynamically from Vault.
Key features:
- Plan on PR, Apply on Merge: Keeps the
masterbranch as the single source of truth for applied infrastructure. - Isolated State: Uses environment-specific state files (
dev.tfstate,prod.tfstate). - Destroy Mode: Supports teardown from CI via a repository variable.
- Vault-Driven: No long-lived credentials in the repo.
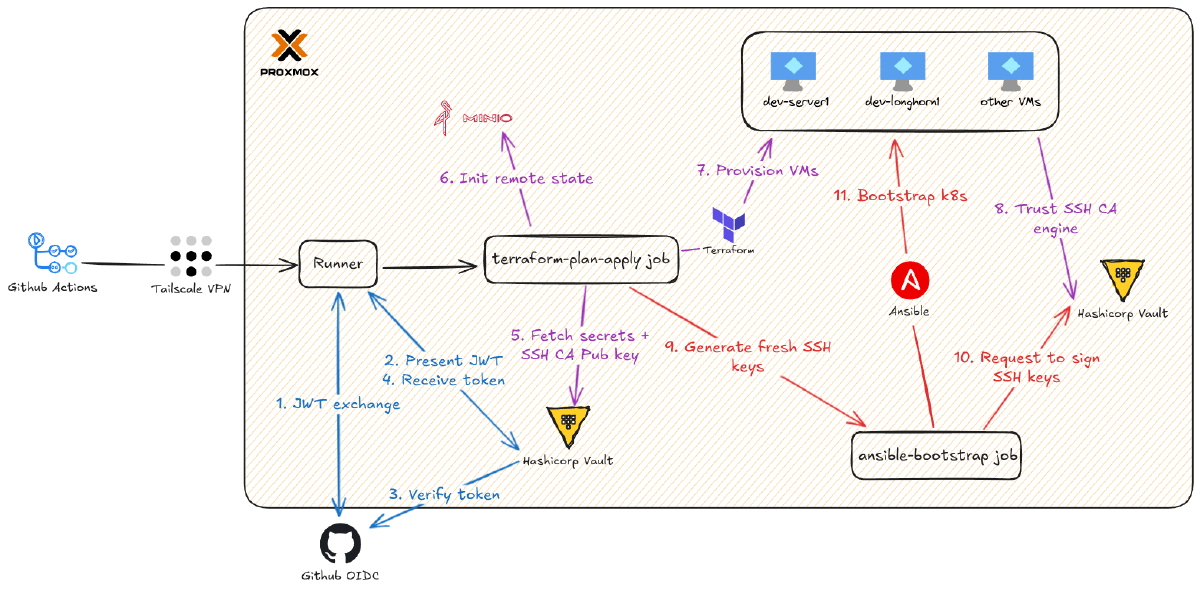
Here’s the job header from .github/workflows/terraform-ansible.yml. The permissions block is critical. That id-token: write permission is what allows the workflow to request a JWT from GitHub’s OIDC provider, which it then presents to Vault.
terraform-plan-apply:
  runs-on: ubuntu-latest

  permissions:
    contents: read # Required to checkout code
    id-token: write # Required to authenticate
    pull-requests: write # Required to post comments on PRs

  defaults:
    run:
      shell: bash
      working-directory: ./terraform-provision
Step-by-Step Breakdown
1. Initial Setup#
- name: Connect to Tailscale
  uses: tailscale/github-action@v2
  with:
    oauth-client-id: ${{ secrets.TS_OAUTH_CLIENT_ID }}
    oauth-secret: ${{ secrets.TS_OAUTH_SECRET }}
    tags: tag:ci

- name: Setup Terraform
  uses: hashicorp/setup-terraform@v3
  with:
    terraform_version: 1.6.6
- This gives the runner access to my homelab via Tailscale.
- It also installs the required Terraform version.
2. Dynamic Role Selection#
- name: Set Vault Role
  id: set-role
  run: |
    if [ "${{ github.event_name }}" == "push" ]; then
      echo "role=${{ vars.ENV_NAME }}-github-actions-push-role" >> $GITHUB_OUTPUT
    else
      echo "role=${{ vars.ENV_NAME }}-github-actions-pr-role" >> $GITHUB_OUTPUT
    fi
- As configured in
terraform-admin, PRs and pushes use different roles (*-pr-rolevs.*-push-role). This step dynamically selects the correct one. $GITHUB_OUTPUTis used to pass the selected role name to the next step.
3. Authenticate to Vault & Fetch Secrets#
- name: Import Secrets from Vault
  uses: hashicorp/vault-action@v3
  with:
    method: jwt
    url: ${{ vars.VAULT_ADDR }}
    role: ${{ steps.set-role.outputs.role }}
    secrets: |
      kv/shared/data/minio access_key | AWS_ACCESS_KEY_ID ;
      kv/shared/data/minio secret_key | AWS_SECRET_ACCESS_KEY ;
      kv/${{ vars.ENV_NAME }}/data/ssh_ca_public_key public_key | TF_VAR_proxmox_ssh_public_key

- name: Import Multiple Proxmox Creds from Vault
  uses: hashicorp/vault-action@v3
  with:
    method: jwt
    url: ${{ vars.VAULT_ADDR }}
    role: ${{ steps.set-role.outputs.role }}
    secrets: |
      kv/shared/data/proxmox ** | TF_VAR_proxmox_ ;
method: jwttells the action to perform the OIDC login.role:uses the output from the previous step.- The
secrets:block is a mapping:vault/path field_name | ENV_VAR_NAME.- Minio keys are mapped to
AWS_ACCESS_KEY_ID/AWS_SECRET_ACCESS_KEYfor Terraform’s S3 backend. - The SSH CA public key is exported as
TF_VAR_proxmox_ssh_public_key, which injects it intocloud-init.
- Minio keys are mapped to
- The
** | TF_VAR_proxmox_ ;syntax is a handy shortcut. It fetches all fields in theproxmoxsecret and prefixes them withTF_VAR_proxmox_(e.g.,api_tokenbecomesTF_VAR_proxmox_api_token).
More on how to config this plugin:
4. Terraform Init & Plan (with optional destroy)#
- name: Terraform Init
  run: terraform init --backend-config="key=${{ vars.ENV_NAME }}.tfstate"

- name: Terraform Plan
  env:
    TF_VAR_env: ${{ vars.ENV_NAME }}
  run: |
    # Check if Destroy mode is enabled
    PLAN_ARGS=""
    if [ "${{ vars.DESTROY }}" == "true" ]; then
      PLAN_ARGS="-destroy"
    fi

    terraform plan $PLAN_ARGS -var-file="env/${{ vars.ENV_NAME }}/main.tfvars" -out .planfile
terraform inituses the AWS creds from Vault to connect to the Minio backend.--backend-config="key=..."selects the environment-specific state file (e.g.,dev.tfstate).- A
DESTROYrepository variable can be set to “true” to run a destroy plan. -out .planfilesaves the exact plan to be used in theapplystep.
(Note: You’ll need to configure variables like ENV_NAME and DESTROY in your repo’s Actions settings.)

5. Post Plan as PR Comment#
- name: Post PR comment
  uses: borchero/terraform-plan-comment@v2
  if: github.event_name == 'pull_request'
  with:
    token: ${{ github.token }}
    working-directory: "./terraform-provision"
    planfile: .planfile
- This step only runs for PRs and posts the plan output as a comment, allowing for review right in the PR.

6. Terraform Apply (Guarded)#
- name: Terraform Apply
  if: github.ref == 'refs/heads/master' && github.event_name == 'push'
  env:
    TF_VAR_env: ${{ vars.ENV_NAME }}
  run: terraform apply -auto-approve .planfile
This is the gate. The apply step only runs on pushes to the master branch (i.e., after a PR is merged), not on PRs themselves. This maintains a strict plan/apply separation.

Setting Up the Ansible Workflow#
Now that the terraform-plan-apply job has provisioned the VMs, this job bootstraps the Kubernetes cluster on them.
Here’s the job header from terraform-ansible.yml. Notice the conditions:
needs: terraform-plan-apply: This is critical. It ensures Ansible only runs after the Terraform job successfully finishes and the VMs actually exist.if: ...: This clause prevents the Ansible job from running during PRs (which are plan-only) or during aDESTROYrun.
ansible-bootstrap:
  runs-on: ubuntu-latest
  needs: terraform-plan-apply
  # Only run if on master, is a push, AND destroy mode is NOT enabled
  if: github.ref == 'refs/heads/master' && github.event_name == 'push' && vars.DESTROY != 'true'

  permissions:
    contents: read # Required to checkout code
    id-token: write # Required to authenticate
Step-by-Step Breakdown
1. Network and Vault Role#
This part is identical to the Terraform job: it connects to Tailscale and uses the set-role step to dynamically choose the *-push-role.
2. Fetch Ansible Secrets from Vault#
This step is similar, but with one critical difference: outputToken: true.
- name: Import Secrets from Vault
  uses: hashicorp/vault-action@v3
  id: vault_auth
  with:
    method: jwt
    url: ${{ vars.VAULT_ADDR }}
    role: ${{ steps.set-role.outputs.role }}
    outputToken: true
    secrets: |
      kv/shared/data/cloudflare * | SSL_ ;
      kv/${{vars.ENV_NAME}}/data/ip * | IP_ ;
      kv/${{vars.ENV_NAME}}/data/rke2 * | RKE2_ ;
outputToken: true: This is the key. Unlike the Terraform job, we need the raw Vault token as an output (steps.vault_auth.outputs.vault_token) so we can use the Vault CLI in the next step to sign our SSH key.- The
* | SSL_wildcard syntax is a clean way to map all fields in a secret (e.g.,API_TOKENinkv/shared/data/cloudflare) to environment variables with a prefix (e.g.,SSL_API_TOKEN).
I then updated my Ansible group_vars to read these new environment variables.
ansible/inventory/group_vars/all.yaml
ansible_user: ubuntu
rke2_version: "v1.32.3+rke2r1"
arch: amd64 # type of machine, raspberry pi use arm64
rke2_token: "{{ lookup('env', 'RKE2_TOKEN') }}" # for authenticate & add nodes in cluster
vip: "{{ lookup('env', 'IP_VIP') }}" # for virtual ip of the servers
vip_cidr: "{{ lookup('env', 'IP_CIDR') }}"
vip_lb_range: "{{ lookup('env', 'IP_LB_RANGE') }}" # load balancer ip range
vip_ingress_ip: "{{ lookup('env', 'IP_INGRESS') }}" # default traefik ip, must be in the range above
ssl_local_domain: "{{ env }}.{{ lookup('env', 'SSL_DOMAIN') }}"
ssl_cloudflare_api_token: "{{ lookup('env', 'SSL_API_TOKEN') }}"
ssl_email: "{{ lookup('env', 'SSL_EMAIL') }}"
3. Generate and Sign Ephemeral SSH Keys#
This is the core of the Zero Trust SSH flow. We install the Vault CLI, generate a new keypair for this job, and have Vault sign the public key.
- uses: eLco/setup-vault@v1
  with:
    vault_version: 1.21.0

- name: Generate and Sign SSH Key
  env:
    VAULT_ADDR: ${{ vars.VAULT_ADDR }}
    VAULT_TOKEN: ${{ steps.vault_auth.outputs.vault_token }}
  run: |
    # Generate a fresh SSH keypair locally (no passphrase)
    ssh-keygen -t rsa -b 4096 -f ./runner_key -q -N ""

    # Send the Public Key to Vault for signing
    vault write -field=signed_key ${{vars.ENV_NAME}}-ssh-client-signer/sign/github-runner \
      public_key=@./runner_key.pub \
      valid_principals=ubuntu > runner_key-cert.pub

    # Set strict permissions
    chmod 600 runner_key
    chmod 644 runner_key-cert.pub
- The private key is generated on the runner and is destroyed when the job finishes. It never leaves the runner.
- We use the Vault token from the previous step to authenticate the
vault writecommand. - Vault signs the public key using the environment-specific SSH CA (
dev-ssh-client-signer) and thegithub-runnerrole. - The resulting certificate (
runner_key-cert.pub) is short-lived (30 minutes, as configured interraform-admin).
4. Build Inventory from Terraform Outputs#
- name: Generate Ansible Inventory
  run: |
    ../scripts/generate-all-hosts.sh ${{ vars.ENV_NAME }}
    cat ./inventory/hosts.ini
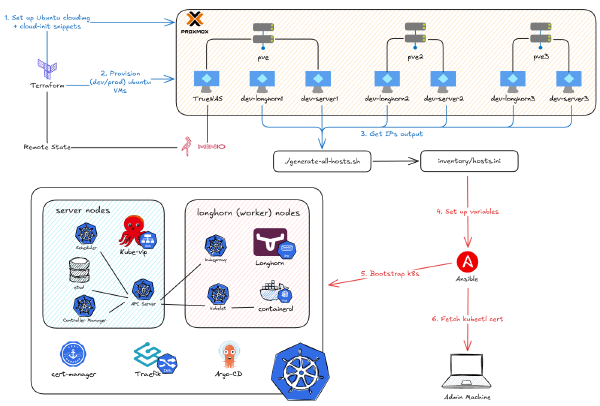
- This script (which I wrote) consumes the
k8s_nodes.jsonoutput from Terraform and builds a standardhosts.inifile for Ansible to use. catthe file to the log, which is a lifesaver for debugging CI.
5. Install Ansible and Collections & Run the Playbook#
- name: Install Ansible
  shell: bash
  run: |
    sudo apt update
    sudo apt install -y ansible

- name: Install Ansible collections
  run: ansible-galaxy install -r requirements.yml

- name: Run playbook
  run: ansible-playbook -e "env=${{ vars.ENV_NAME }}" --private-key runner_key site.yaml
This is the final step. Ansible uses the ephemeral, signed SSH key to connect and run the cluster bootstrap.
--private-key runner_key: Ansible automatically finds and uses the corresponding certificate (runner_key-cert.pub).- The playbook then runs all the roles (downloading RKE2, adding servers and agents, applying kube-vip and Longhorn, etc.) and successfully bootstraps the cluster.

This pipeline is a complete example of Zero Trust principles in action: short-lived identities, scoped policies, and ephemeral network access. The moment you see vault-action successfully mint a token and vault write return a signed SSH cert, that’s the “JWT authentication pays off” moment.
Summary & next steps#
So, as you can see, this is my longest post to date. Migrating the homelab automation to GitHub Actions + HashiCorp Vault wasn’t a single leap but a series of decisions about trust, scope, and operational burden.
What I gained:
- A repeatable, observable CI/CD pipeline that provisions and configures infrastructure without manual secrets.
- A much tighter blast-radius through policy separation and ephemeral credentials.
- An extensible platform: adding new secret engines (like
transitfor encryption ordatabasefor dynamic DB creds) is now straightforward.
What still needs work (Next Steps):
- Automate Vault Unseal: Move to an auto-unseal backend (like a cloud KMS) or deploy Vault in a high-availability Kubernetes cluster.
- Add Runtime Tests: Implement smoke tests in the pipeline to probe Kubernetes endpoints after deployment to verify health.
- Dynamic
kubectlAccess: Since Vault is now an OIDC provider, I can integrate it with Kubernetes (and maybe Keycloak) to grant dynamic, short-livedkubectlaccess instead of using static kubeconfig files.
Yeah, it was a lot of work. But once it clicks, the day-to-day overhead drops sharply - and you’ll stop having to remember which machine had the old SSH key.
Happy automating.