This is Part 3 of the Hashicorp Vault series. In Part 1, we bootstrapped Vault. In Part 2, we built the full CI/CD pipeline. Now, we’re solving the final, massive headache: getting secure, dynamic kubectl access.
The Problem: Static Kubeconfig Files#
So, how do you talk to your cluster? kubectl, right? And how does kubectl know where to go? The good old kubeconfig file.
Let’s be honest, we’ve all done the same thing: you scp the admin config from your control plane, save it to ~/.kube/config, and call it a day. I was no different.
dev-rke2 (argo-cd) in ~
❯ scp -i signed.pub -i ~/.ssh/id_ed25519 [email protected]:~/.kube/config ~/.kube/dev.yml
config                                                                                                                                                    100% 2971   370.8KB/s   00:00
dev-rke2 (argo-cd) in ~
❯ cat ~/.kube/dev.yml
apiVersion: v1
clusters:
- cluster:
    certificate-authority-data: <<REDACTED_CERT_DATA>>
    server: https://10.69.1.111:6443
  name: default
contexts:
- context:
    cluster: default
    user: default
  name: default
current-context: default
kind: Config
preferences: {}
users:
- name: default
  user:
    client-certificate-data: <<REDACTED_CERT_DATA>>
    client-key-data: <<REDACTED_KEY_DATA>>
But that file is a ticking time bomb. It’s not just a config; it’s a static, super-powered master key to your entire cluster. That client-certificate-data probably has cluster-admin rights and never expires.
What happens when you lose your laptop? Or when someone leaves the team? You can’t just revoke one person’s “key.” You have to rotate certs for the entire cluster (and let’s be real, nobody does that). When everyone uses the same admin config, you have zero audit trail. You have no idea who deleted that deployment at 3 AM.
This isn’t a theoretical problem. This is exactly what happened to me. As I mentioned in Part 1, when my laptop died, I didn’t just lose my SSH keys; I lost my only kubeconfig file. I was completely, 100% locked out. I had to re-bootstrap the entire cluster from scratch. That was the moment I decided: no more static kubeconfigs. Ever.
After I got the GitHub Actions OIDC flow working with Vault, I was motivated to do the same for kubectl. The goal: kubectl should authenticate me, as a human, and give me a temporary, role-based ticket.

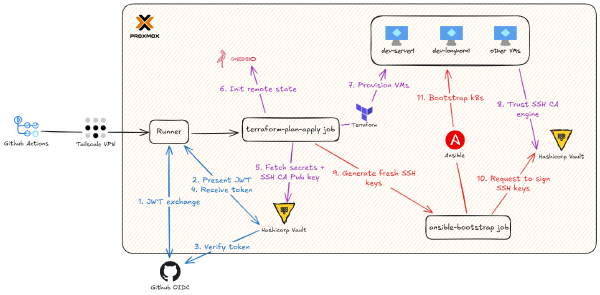
My GitHub runner auth was my guide:
Runner asks GitHub (OIDC Provider) for a token.
Runner gives that token to Vault.
Vault verifies the token and grants access.
So, for kubectl, I just need to swap the pieces:
The “runner” is now my local machine.
The “target” is the Kubernetes API server.
…and I still need an OIDC provider.
My first thought was to use Keycloak, Authentik, or Authelia. But this immediately created a new chicken-and-egg problem: these tools run on Kubernetes. How do you deploy the auth app when you can’t even authenticate to the cluster to deploy anything? I could try to jam it in with Ansible, but debugging that without kubectl sounded like a special kind of hell.
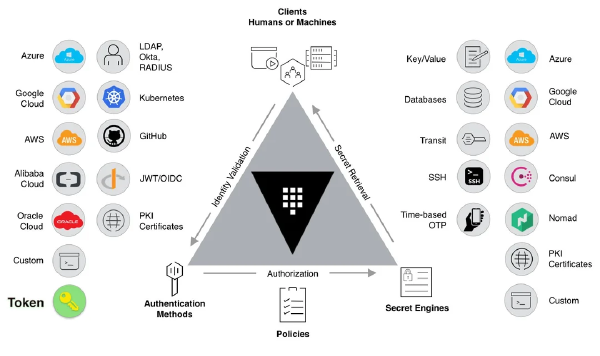
Then it hit me. Coincidentally, the tool I just set up to manage my secrets in the previous part also happened to be a OIDC provider.
The Solution: Vault as an OIDC Provider#
However, before we can log in to Vault and get the JWT token just like the runner did with Github, there’s a catch. kubectl on its own is… well, kinda dumb. It doesn’t know how to pop open a browser and say “log me in.” It just knows how to use a token if it has one.
To fix this, we need a helper: kubelogin. This is a small kubectl plugin that does the magic. When you run kubectl get nodes, kubelogin hijacks the process. It sees you don’t have a valid token, pops open your browser, and makes you log into Vault (with a username/password, just like any other website). Once you’re in, Vault generates a short-lived ID token and sends it back to kubelogin.
But here’s the really cool part. Vault doesn’t just give you a generic token. It stuffs it with claims - information about you.
sub(subject): Your username (e.g.,phuchoang)groups: A list of groups you’re in (e.g.,cluster-admins,dev-viewers)iss(issuer) &aud(audience): Cryptographic proof saying, “This token definitely came from my Vault server and was meant for my Kubernetes cluster.”
Finally, kubectl takes this shiny new token and shows it to the Kubernetes API server. The API server (which we’ll configure to trust Vault) checks the iss and aud fields. If they look good, it passes your groups claim to the RBAC (Role-Based Access Control) system. RBAC makes the final call. If you’re in the dev-viewers group and you try to kubectl create deployment, RBAC will shut you down. No-fly zone.
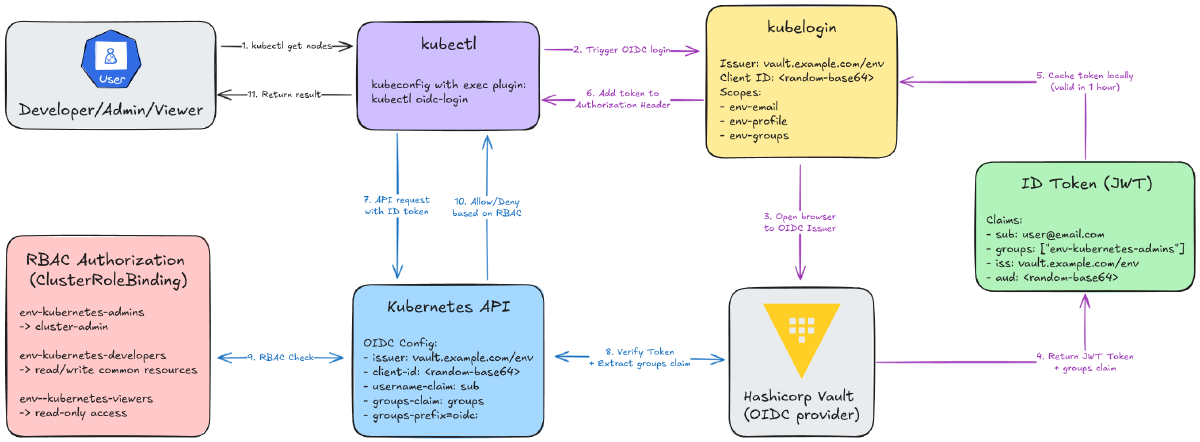
Here’s the whole flow:

The kubelogin Side (Steps 1-6):
You type
kubectl get nodes.kubectl/kubeloginsees you have no token (or it’s expired).A browser pops open. You log into Vault.
Vault sends back an ID token stuffed with your user and group info.
kubeloginsnags that token and caches it.kubectl(now happy) uses this token in its request.
The K8s API Server Side (Steps 7-11):
kubectlsends the API request with the token.The API server verifies the token’s signature against Vault’s.
If valid, it extracts your
userandgroupsfrom the token.It asks RBAC: “Hey, is a user from the
cluster-adminsgroup allowed toget nodes?”RBAC says “yep,” and you get your list of nodes.
With that background, let’s (again) jump into the implementation.
Step 1: Configure Vault as an OIDC Provider#
In the last part, getting the GitHub Actions runner to authenticate was way easier. The runner and the OIDC provider were both just “GitHub,” so they already trusted each other.
Now, we’re connecting two totally different worlds: our local kubectl and our self-hosted Vault. This means we have to do a lot more manual wiring. And let’s be real, trying to click through 15 different settings in the clunky Vault UI is a recipe for error and a nightmare to reproduce.
So, Terraform to the rescue.
We’ll add this new configuration to our existing terraform-admin project. It’s a one-time setup, just like the JWT auth backend and SSH CA we did before. We’re basically going to teach Vault how to be a full-blown OIDC provider.
This breaks down into a few key parts:
A user backend: How do we prove who we are? We’ll set up a simple
userpass(username/password) backend for now. (Keep in mind, you could get fancy and use other auth methods like LDAP or even cloud auth).Identity Groups: We’ll create our “teams” -
admins,developers, andviewers.OIDC Scopes: We’ll define what info (like our group membership) to stuff inside the token.
The OIDC Provider: This is the actual endpoint that
kubeloginwill talk to, tying everything together.
Creating Vault Identity Groups#
First, we need to create our “teams” inside Vault. These are Identity Groups that will map directly to the RBAC (Role-Based Access Control) roles we’ll create in Kubernetes later. This is the crucial link between a Vault user and a Kubernetes permission.
File: terraform-admin/modules/vault-oidc-kubernetes/main.tf
# Create Vault groups for Kubernetes RBAC
resource "vault_identity_group" "kubernetes_admins" {
  name     = "${var.env}-kubernetes-admins"
  type     = "internal"
  policies = []

  metadata = {
    environment = var.env
    purpose     = "Kubernetes cluster administrators"
  }
}

resource "vault_identity_group" "kubernetes_developers" {
  name     = "${var.env}-kubernetes-developers"
  type     = "internal"
  policies = []

  metadata = {
    environment = var.env
    purpose     = "Kubernetes application developers"
  }
}

resource "vault_identity_group" "kubernetes_viewers" {
  name     = "${var.env}-kubernetes-viewers"
  type     = "internal"
  policies = []

  metadata = {
    environment = var.env
    purpose     = "Kubernetes read-only viewers"
  }
}
I’m setting up three groups to match a standard RBAC setup:
kubernetes-admins: Full cluster-admin. The “god mode” users.kubernetes-developers: Can manage apps (pods, deployments, secrets), but can’t touch nodes or cluster settings.kubernetes-viewers: Look, don’t touch. Read-only access for everyone else.
A quick heads-up: When Kubernetes receives these group names from Vault’s token, it will automatically add an oidc: prefix to them (e.g., oidc:dev-kubernetes-admins). This is a built-in K8s feature to prevent name collisions with its own internal groups. We’ll just need to remember this when we write our RBAC policies.

Configuring OIDC Scopes#
Next, we need to tell Vault what data to put inside the OIDC token it generates. By default, a token is pretty empty. We use OIDC Scopes to “stuff” it with the info we need.
# Create OIDC key for signing tokens
resource "vault_identity_oidc_key" "kubernetes" {
  name               = "${var.env}-kubernetes"
  allowed_client_ids = ["*"]
  rotation_period    = 3600
  verification_ttl   = 3600
}

# Create custom scope for email
resource "vault_identity_oidc_scope" "email" {
  name        = "${var.env}-email"
  description = "Email scope for ${var.env} Kubernetes"
  template    = <<-EOT
    {
      "email": {{identity.entity.metadata.email}}
    }
  EOT
}

# Create custom scope for profile
resource "vault_identity_oidc_scope" "profile" {
  name        = "${var.env}-profile"
  description = "Profile scope for ${var.env} Kubernetes"
  template    = <<-EOT
    {
      "name": {{identity.entity.name}},
      "preferred_username": {{identity.entity.aliases.${var.userpass_auth_accessor}.name}}
    }
  EOT
}

# Create custom scope for groups
resource "vault_identity_oidc_scope" "groups" {
  name        = "${var.env}-groups"
  description = "Groups scope for ${var.env} Kubernetes"
  template    = <<-EOT
    {
      "groups": {{identity.entity.groups.names}}
    }
  EOT
}
We need three custom scopes:
email: Puts the user’s email in the token. This is great for audit logs.profile: Adds the user’sname. This is what will show up as the “user” inkubectlaudit logs.groups: This is the most important one. It adds a list of all the Vault groups the user is in (likedev-kubernetes-admins). This is the claim that Kubernetes RBAC will use to decide what you’re-allowed to do.
You’ll also see a vault_identity_oidc_key resource. This is just Vault creating the cryptographic key it will use to sign all the OIDC tokens it issues.
The magic is in the template for each scope. We’re using Vault’s templating to tell it exactly where to pull this data from the user’s “Identity Entity” when they log in.
A quick, lazy confession: The
preferred_usernameI’m creating in theprofilescope is basically thesub(subject) claim. I probably should have used the standardsubfield, but I was too lazy to go back and change everything. It works. 😅

Creating the OIDC Provider and Client#
Okay, we have our groups and we know what our token will look like. Now we need to create the actual OIDC Provider - this is the endpoint that kubelogin will hit.
# Create OIDC provider
resource "vault_identity_oidc_provider" "kubernetes" {
  name = var.env

  https_enabled = true
  issuer_host   = replace(var.vault_addr, "https://", "")

  allowed_client_ids = [
    vault_identity_oidc_client.kubernetes.client_id
  ]

  scopes_supported = [
    vault_identity_oidc_scope.email.name,
    vault_identity_oidc_scope.profile.name,
    vault_identity_oidc_scope.groups.name,
  ]
}

# Create OIDC assignment (controls who can authenticate)
resource "vault_identity_oidc_assignment" "kubernetes" {
  name = "${var.env}-kubernetes-users"

  group_ids = [
    vault_identity_group.kubernetes_admins.id,
    vault_identity_group.kubernetes_developers.id,
    vault_identity_group.kubernetes_viewers.id,
  ]
}

# Create OIDC client for Kubernetes
resource "vault_identity_oidc_client" "kubernetes" {
  name = "${var.env}-kubernetes"
  key  = vault_identity_oidc_key.kubernetes.name

  redirect_uris = var.redirect_uris

  assignments = [
    vault_identity_oidc_assignment.kubernetes.name
  ]

  id_token_ttl     = 3600 # 1 hour
  access_token_ttl = 3600 # 1 hour

  client_type = "public"
}

# Store OIDC client_id in Vault KV for use by Ansible
resource "vault_generic_secret" "oidc_client_id" {
  path = "kv/${var.env}/oidc"

  data_json = jsonencode({
    client_id = vault_identity_oidc_client.kubernetes.client_id
  })
}
This piece of configuration ties everything together:
It defines the OIDC client (our “application,” which in this case is
kubelogin).It sets the
redirect_uris. This is a critical security step. It’s an allow-list of URLs that Vault is allowed to send a user back to after they log in. Sincekubeloginruns a tiny web server on your local machine to catch the token, we must addhttp://localhost:8000(and18000as a backup) here.It sets the token TTL. I set it to
3600seconds (1 hour). This feels like a good balance between security (short-lived tokens) and usability (not having to log in every 5 minutes).It assigns our
admins,developers, andviewersgroups to this provider, so only members of these groups can log in.
A few key things to notice in the code:
client_type = "public": This is important. It means our client (kubelogin) doesn’t need a “client secret” to authenticate. This is the correct choice for a CLI tool running on a user’s workstation where a secret can’t be securely stored.vault_generic_secret "oidc_client_id": This is the most important handoff in this whole file. Vault will generate a random, uniqueclient_idfor our app. We can’t know this ID in advance. So, we use this Terraform resource to read that generated ID and write it back into a Vault KV secret atkv/dev/oidc.- Why? Because our Ansible script (in the next step) will need to read this exact ID to configure the Kubernetes API server. This is how we pass this critical, dynamic value from our
terraform-adminsetup to our cluster bootstrap process.
- Why? Because our Ansible script (in the next step) will need to read this exact ID to configure the Kubernetes API server. This is how we pass this critical, dynamic value from our

Module Usage in Main Configuration#
Finally, we just need to call this new vault-oidc-kubernetes module from our main terraform-admin/main.tf file. We’ll call it twice: once for dev and once for prod.
File: terraform-admin/main.tf
# Vault OIDC Provider for Kubernetes (Dev)
module "vault_oidc_dev" {
  source = "./modules/vault-oidc-kubernetes"

  env                    = "dev"
  vault_addr             = var.vault_addr
  userpass_auth_accessor = vault_auth_backend.userpass.accessor

  redirect_uris = [
    "http://localhost:8000",  # kubelogin default
    "http://localhost:18000", # kubelogin alternative
  ]
}

# Vault OIDC Provider for Kubernetes (Prod)
module "vault_oidc_prod" {
  source = "./modules/vault-oidc-kubernetes"

  env                    = "prod"
  vault_addr             = var.vault_addr
  userpass_auth_accessor = vault_auth_backend.userpass.accessor

  redirect_uris = [
    "http://localhost:8000",  # kubelogin default
    "http://localhost:18000", # kubelogin alternative
  ]
}
This creates two completely separate and isolated OIDC providers. A user in the dev-kubernetes-admins group will have zero ability to even try to log in to the prod environment, which is exactly what we want.

You’ll also notice we pass in that weird userpass_auth_accessor variable. This is a bit of Vault-Terraform magic. It’s the unique ID of the userpass auth method we set up.
Why? Go back and look at the profile scope template: ...{{identity.entity.aliases.${var.userpass_auth_accessor}.name}}
This is how the template finds the user’s alias (their username) from the specific auth method they used to log in. It’s a bit of a mouthful, but it’s the glue that connects the user’s login action to their Vault identity.
Step 2: User Management with Terraform#
Okay, so we’ve built the “house” (the OIDC provider, auth methods, and empty groups). Now we need to create the “guest list” - the actual user accounts and the keys to let them in.
This is the whole point of our terraform-admin project: automating the “day 2” operations, not just the “day 1” setup. We’re not going to click “add user” in the UI like savages.
My User Management Strategy#
After some trial and error, I landed on a pattern that is clean, reusable, and, most importantly, easy to manage from a single file.
Define All Users in
terraform.tfvars: I want a single, human-readable file to define who gets access to what.Use a Simple “User Factory” Module: This module’s only job is to create a single user’s login, their “entity” (their identity), and the “alias” that links them.
Handle Group Memberships Separately: This is the most important part. We’ll create all the users first, then add them to their groups. This avoids a world of pain with Terraform’s dependency cycles.
1. Defining Users with Variables (The “Guest List”)#
First, let’s define what a “user” looks like in our terraform-admin/variables.tf. I wanted a map where I could see, at a glance, every user and their exact permissions for each environment.
File: terraform-admin/variables.tf
variable "users" {
  description = "Map of users to create with their group memberships"
  type = map(object({
    email    = string
    password = string
    groups = object({
      dev_role  = optional(string) # "admins", "developers", "viewers", or null
      prod_role = optional(string) # "admins", "developers", "viewers", or null
    })
  }))
  default = {}
  validation {
    condition = alltrue([
      for user in var.users : alltrue([
        for role in [user.groups.dev_role, user.groups.prod_role] :
        role == null || contains(["admins", "developers", "viewers"], role)
      ])
    ])
    error_message = "Role must be one of: 'admins', 'developers', 'viewers', or null."
  }
}
This structure is super flexible. The groups object lets me give a user dev access, prod access, both, or neither.
Here’s what it looks like in practice. This is the only file I’ll need to edit when a new person joins the team.
File: terraform-admin/terraform.tfvars.example
users = {
  # Developer with dev access only
  "developer" = {
    email    = "[email protected]"
    password = "CHANGE-ME-SECURE-PASSWORD"
    groups = {
      dev_role  = "developers"
      prod_role = null # No prod access
    }
  }

  # Viewer with read-only access to both environments
  "viewer" = {
    email    = "[email protected]"
    password = "CHANGE-ME-SECURE-PASSWORD"
    groups = {
      dev_role  = "viewers"
      prod_role = "viewers"
    }
  }

  # Prod-only admin
  "prod-admin" = {
    email    = "[email protected]"
    password = "CHANGE-ME-SECURE-PASSWORD"
    groups = {
      dev_role  = null # No dev access
      prod_role = "admins"
    }
  }
}
2. The User Module (The “User Factory”)#
Next, we need a simple, reusable module that knows how to create one user. This module does three distinct things to create a complete identity in Vault:
vault_generic_endpoint "user": This creates theuserpasslogin (the actual username and password they’ll type in the browser).vault_identity_entity "user": This creates the Entity. Think of this as the user’s “soul” or their core identity in Vault. It holds metadata like their email.vault_identity_entity_alias "user": This is the glue. It links theuserpasslogin (the “door”) to theentity(the “person”).
File: terraform-admin/modules/vault-user/main.tf
# 1. Create the login (username/password)
resource "vault_generic_endpoint" "user" {
  path                 = "auth/${var.userpass_mount_path}/users/${var.username}"
  ignore_absent_fields = true

  data_json = jsonencode({
    password    = var.password
    token_ttl   = var.token_ttl
    token_max_ttl = var.token_max_ttl
  })
}

# 2. Create the "person" (the Entity)
resource "vault_identity_entity" "user" {
  name     = var.username
  metadata = {
    email = var.email
  }
}

# 3. Link the login to the person (the Alias)
resource "vault_identity_entity_alias" "user" {
  name           = var.username
  mount_accessor = var.userpass_auth_accessor
  canonical_id   = vault_identity_entity.user.id
}
Notice what’s missing? I’m not managing group memberships here. We pass in an empty group_ids = [] list. This is intentional. Trying to manage groups inside this for_each’d module while the groups themselves are also being created in a for_each loop is a one-way ticket to dependency-cycle hell. Trust me, don’t do it.

3. The Main Configuration (The “Sorting Hat”)#
This is the “master orchestrator” file (terraform-admin/users.tf) that brings it all together. It’s a bit of Terraform data-gymnastics, but it’s very clean once it’s set up.
File: terraform-admin/users.tf
locals {
  # Create a flat map of user-to-group assignments with static keys
  # This avoids Terraform's "for_each with unknown values" limitation
  user_group_memberships = merge(flatten([
    for username, user in var.users : [
      user.groups.dev_role != null ? {
        "${username}-dev-${user.groups.dev_role}" = {
          username = username
          env      = "dev"
          role     = user.groups.dev_role
        }
      } : {},
      user.groups.prod_role != null ? {
        "${username}-prod-${user.groups.prod_role}" = {
          username = username
          env      = "prod"
          role     = user.groups.prod_role
        }
      } : {}
    ]
  ])...)
}

# Create users (without group assignments)
module "vault_users" {
  source   = "./modules/vault-user"
  for_each = var.users

  username               = each.key
  password               = each.value.password
  email                  = each.value.email
  group_ids              = [] # Groups will be managed separately
  userpass_mount_path    = "userpass"
  userpass_auth_accessor = vault_auth_backend.userpass.accessor

  depends_on = [
    module.vault_oidc_dev,
    module.vault_oidc_prod
  ]
}

# Manage group memberships with static keys
# Each resource assigns one user to one group
resource "vault_identity_group_member_entity_ids" "user_group_assignments" {
  for_each = local.user_group_memberships

  group_id = each.value.env == "dev" ? (
    module.vault_oidc_dev.group_ids[each.value.role]
    ) : (
    module.vault_oidc_prod.group_ids[each.value.role]
  )

  member_entity_ids = [module.vault_users[each.value.username].entity_id]
  exclusive         = false

  depends_on = [
    module.vault_users,
    module.vault_oidc_dev,
    module.vault_oidc_prod
  ]
}
And that’s it! It looks complex, but the flow is simple:
localstransforms our human-friendlytfvarsfile into thegroup_membershipsmap that Terraform needs.module "vault_users"creates all the users in parallel (but assigns them no groups).vault_identity_group_member_entity_idsthen acts like the “Sorting Hat,” looping through each group and adding all its members in one go.
This two-step process (create users, then assign groups) neatly sidesteps all the complex dependency issues and makes the whole setup clean and manageable.

Step 3: Configure the Kubernetes API Server for OIDC#
Okay, so Vault is now ready to act as an OIDC provider. It’s sitting there, ready to issue tokens to our users.
Now we have to do the other half of the handshake: we need to tell our Kubernetes cluster to trust it.
If Vault is the bouncer, we need to give the Kubernetes API server a “guest list” and tell it, “If someone shows up with an ID from this bouncer, let them in.”
This is the “what we’re doing” part. Since I’m using Ansible to provision RKE2, I’ll be editing my Ansible template for the RKE2 server config.
Updating RKE2 Server Configuration#
This is the core of the connection. We need to add several kube-apiserver-arg flags to the RKE2 config. These are just command-line arguments that tell the Kubernetes API server how to behave.
File: ansible/roles/add_server/templates/rke2-server-config.j2
write-kubeconfig-mode: "0644"
token: {{ rke2_token }}
tls-san:
  - {{ vip }}
{% for host in groups['servers'] %}
  - {{ hostvars[host]['ansible_host'] }}
{% endfor %}
node-label:
  - server=true
disable-cloud-controller: true
disable:
- rke2-ingress-nginx
kube-proxy-arg:
  - "proxy-mode=ipvs"
  - "ipvs-strict-arp=true"
kube-proxy-extra-mount:
- "/lib/modules:/lib/modules:ro"
kube-apiserver-arg:
  - "oidc-issuer-url={{ oidc_issuer_url }}"
  - "oidc-client-id={{ oidc_client_id }}"
  - "oidc-username-claim=preferred_username"
  - "oidc-groups-claim=groups"
  - "oidc-groups-prefix=oidc:"
Here’s a breakdown of the exact flags we need to add:
oidc-issuer-url: This is the most important one. It’s the URL to our Vault OIDC provider. When the API server gets a token, it will use this URL to go fetch Vault’s public keys (from a well-known endpoint) and verify the token’s signature. This is how it knows the token is legit.oidc-client-id: This is the “audience” check. It tells the API server, “Only accept tokens that were meant for me.” Remember thatclient_idVault generated for us? This is it. If a token doesn’t have this exact ID in itsaudclaim, the API server will reject it.oidc-username-claim: “When you get a valid token, which field has the user’s name?” We set this up in Step 1 to bepreferred_username.oidc-groups-claim: “And which field has their list of groups?” We called oursgroups.oidc-groups-prefix: This is a great best practice. It automatically sticksoidc:onto the front of any group name it gets from the token (e.g.,dev-kubernetes-adminsbecomesoidc:dev-kubernetes-admins). This makes it super obvious in our RBAC policies which groups are from OIDC versus built-in K8s groups.
Connecting the Dots: From Vault to GitHub to Ansible#
This is where all the pieces we’ve been building finally click together. How does our Ansible script, running in a GitHub Actions runner, get these values?
1. Ansible Needs the Variables: First, I tell Ansible to expect these values from environment variables. My group_vars/all/main.yaml file looks for them.
oidc_issuer_url: "{{ lookup('env', 'OIDC_ISSUER_URL') }}"
oidc_client_id: "{{ lookup('env', 'OIDC_CLIENT_ID') }}"
2. GitHub Actions Provides the Variables: This is the beautiful part. Our GitHub Actions workflow is responsible for fetching these values and making them available to Ansible.
OIDC_CLIENT_ID: This is the critical handoff from Step 1. We can’t hardcode this value, because Vault generated it for us. Ourterraform-adminrun saved that dynamic ID into a KV secret (kv/dev/data/oidc). Now, our GitHub workflow just reads that value right back out of Vault.OIDC_ISSUER_URL: This one is easy. We can just construct it. It’s just ourVAULT_ADDRvariable plus the static path/v1/identity/oidc/provider/and the environment name (devorprod).
Here’s the snippet from the GitHub Actions workflow that does this work. It logs into Vault, grabs the dynamic client_id from the K/V store, and builds the issuer_url from variables.
- name: Import Secrets from Vault
  uses: hashicorp/vault-action@v3
  id: vault_auth
  with:
    method: jwt
    url: ${{ vars.VAULT_ADDR }}
    role: ${{ steps.set-role.outputs.role }}
    outputToken: true
    secrets: |
      kv/shared/data/cloudflare * | SSL_ ;
      kv/${{vars.ENV_NAME}}/data/ip * | IP_ ;
      kv/${{vars.ENV_NAME}}/data/rke2 * | RKE2_ ;
      kv/${{vars.ENV_NAME}}/data/oidc client_id | OIDC_CLIENT_ID ;

- name: Set OIDC Issuer URL
  run: |
    echo "OIDC_ISSUER_URL=${{ vars.VAULT_ADDR }}/v1/identity/oidc/provider/${{ vars.ENV_NAME }}" >> $GITHUB_ENV
Once these are exported as environment variables, Ansible picks them up, templates them into the rke2-server-config.j2 file, and restarts the RKE2 server.
And just like that, our Kubernetes cluster now fully trusts our Vault server as an identity provider.
Step 4: Deploy Kubernetes RBAC Policies#
We’re on the home stretch.
So far:
Vault is our “bouncer,” ready to issue signed ID cards (OIDC tokens).
The Kubernetes API server is our “club,” and we’ve configured it to trust that bouncer (via the OIDC flags).
Now for the final and most important step: writing the guest list.
We need to tell Kubernetes, “Okay, when someone does show up with a valid ID card that says they’re in the oidc:dev-kubernetes-admins group, what are they actually allowed to do?”
This is all handled by standard Kubernetes RBAC (Role-Based Access Control) manifests. We’ll create ClusterRoleBindings that link our OIDC groups to specific permissions.
1. The ‘Admins’ (God Mode)#
This one is the easiest. We need to give our admins group full, unrestricted, “do-anything” power. In Kubernetes, this is the built-in cluster-admin role.
File: ansible/roles/add_server/templates/oidc-rbac-cluster-admin.yaml.j2
---
# Grant cluster-admin to kubernetes-admins group
apiVersion: rbac.authorization.k8s.io/v1
kind: ClusterRoleBinding
metadata:
  name: oidc-cluster-admins
  annotations:
    description: "Grants cluster-admin access to kubernetes-admins group"
roleRef:
  apiGroup: rbac.authorization.k8s.io
  kind: ClusterRole
  name: cluster-admin
subjects:
  - kind: Group
    name: oidc:{{ env }}-kubernetes-admins
    apiGroup: rbac.authorization.k8s.io
We just need to create a ClusterRoleBinding to “bind” our Vault group to this all-powerful role.
The single most important line in this file is the name under subjects. It must be oidc:{{ env }}-kubernetes-admins.
That oidc: prefix isn’t optional. It’s the prefix we told the API server to add (--oidc-groups-prefix=oidc:). If you forget this, the binding won’t match, and your “admin” user will log in with zero permissions, which is a very confusing 20 minutes of debugging.
2. The ‘Developers’ (The “Do-ers”)#
This is the most interesting role and the one that required the most thought. I don’t want my developers to have cluster-admin - that’s how you get “oops, I deleted the prod namespace” accidents. But I also despise being a bottleneck. If a developer needs to check logs or deploy a new image, they shouldn’t have to file a ticket with me.
The philosophy for this developer ClusterRole is: Freedom to ship, not freedom to break.
File: ansible/roles/add_server/templates/oidc-rbac-developer.yaml.j2
---
# Developer role with read/write access to common resources
apiVersion: rbac.authorization.k8s.io/v1
kind: ClusterRole
metadata:
  name: developer
rules:
  # Core resources
  - apiGroups: [""]
    resources:
      [
        "pods",
        "pods/log",
        "pods/exec",
        "services",
        "configmaps",
        "secrets",
        "persistentvolumeclaims",
      ]
    verbs: ["get", "list", "watch", "create", "update", "patch", "delete"]
  # Apps
  - apiGroups: ["apps"]
    resources: ["deployments", "statefulsets", "daemonsets", "replicasets"]
    verbs: ["get", "list", "watch", "create", "update", "patch", "delete"]
  # Batch jobs
  - apiGroups: ["batch"]
    resources: ["jobs", "cronjobs"]
    verbs: ["get", "list", "watch", "create", "update", "patch", "delete"]
  # Networking
  - apiGroups: ["networking.k8s.io"]
    resources: ["ingresses", "networkpolicies"]
    verbs: ["get", "list", "watch", "create", "update", "patch", "delete"]
  # Autoscaling
  - apiGroups: ["autoscaling"]
    resources: ["horizontalpodautoscalers"]
    verbs: ["get", "list", "watch", "create", "update", "patch", "delete"]
  # Read-only access to nodes and namespaces
  - apiGroups: [""]
    resources: ["nodes", "namespaces"]
    verbs: ["get", "list", "watch"]
---
# Bind developer role to kubernetes-developers group
apiVersion: rbac.authorization.k8s.io/v1
kind: ClusterRoleBinding
metadata:
  name: oidc-developers
  annotations:
    description: "Grants developer access to kubernetes-developers group"
roleRef:
  apiGroup: rbac.authorization.k8s.io
  kind: ClusterRole
  name: developer
subjects:
  - kind: Group
    name: oidc:{{ env }}-kubernetes-developers
    apiGroup: rbac.authorization.k8s.io
So, what can they do?
They CAN manage the full lifecycle of applications. This means
create,update,delete, andgetfor things likepods,deployments,services,configmaps,secrets,ingresses, andjobs.They CAN debug. This is crucial. They have
pods/exec(to get into a container) andpods/log(to read logs).They CAN’T touch the cluster infrastructure. They can’t delete
nodes. They can’t create or deletenamespaces(though they can view them). And they absolutely cannot modifyClusterRolesorClusterRoleBindings(especially their own!).
This strikes the perfect balance, in my opinion. They can deploy and manage their apps all day long without ever having the power to take down the whole cluster.
3. The ‘Viewers’ (The Easy Win)#
This one is another simple one. I don’t need to create a fancy custom role because Kubernetes already gives us a built-in ClusterRole called view.
File: ansible/roles/add_server/templates/oidc-rbac-viewer.yaml.j2
---
# Grant view-only access to kubernetes-viewers group
apiVersion: rbac.authorization.k8s.io/v1
kind: ClusterRoleBinding
metadata:
  name: oidc-viewers
  annotations:
    description: "Grants read-only access to kubernetes-viewers group"
roleRef:
  apiGroup: rbac.authorization.k8s.io
  kind: ClusterRole
  name: view
subjects:
  - kind: Group
    name: oidc:{{ env }}-kubernetes-viewers
    apiGroup: rbac.authorization.k8s.io
It does exactly what it says on the tin: get, list, and watch permissions on almost everything, but zero write access and (importantly) no permission to read secrets.
We just create one more ClusterRoleBinding to map our oidc:{{ env }}-kubernetes-viewers group directly to this view role. This is perfect for new team members, auditors, or anyone in the “just-looking” category.
Local Authentication with kubelogin (The Magic)#
So, we have Vault ready to give out tokens, and K8s ready to accept them. How do we glue our local kubectl command to this new flow?
As I mentioned, kubectl is dumb. It only knows how to use a token, not how to get one from a browser. We need a translator. That translator is a slick little kubectl plugin called kubelogin.
It’s a small helper that sits between kubectl and your OIDC provider, and its only job is to handle the browser-based login flow.
Installing kubelogin#
# Install kubelogin
brew install int128/kubelogin/kubelogin  # macOS
# or
kubectl krew install oidc-login          # via krew
Configuring Your New kubeconfig#
This is the last kubeconfig file you’ll ever need to build by hand. Instead of having that massive, static client-certificate-data block, our new users section looks totally different. We’re going to use an exec block.
apiVersion: v1
kind: Config
clusters:
  - cluster:
      server: https://10.69.1.110:6443
      certificate-authority-data: <CA_DATA>
    name: dev
contexts:
  - context:
      cluster: dev
      user: oidc
    name: dev
current-context: dev
users:
  - name: oidc
    user:
      exec:
        apiVersion: client.authentication.k8s.io/v1beta1
        command: kubectl
        args:
          - oidc-login
          - get-token
          - --oidc-issuer-url=https://vault.example.com/v1/identity/oidc/provider/dev
          - --oidc-client-id=<CLIENT_ID>
          - --oidc-extra-scope=email
          - --oidc-extra-scope=profile
          - --oidc-extra-scope=groups
This exec block basically tells kubectl:
“Hey, before you try to talk to the cluster, I want you to execute a command first. Run
kubectl oidc-login get-tokenand pass it all these arguments. That command will spit out a token, and that’s what you’ll use for authentication.”
The arguments we give it are exactly what we just configured in Vault and K8s:
--oidc-issuer-url: The URL to our Vault OIDC provider (e.g.,https://vault.example.com/.../provider/dev).--oidc-client-id: The dynamic, unique ID thatterraform-admingenerated and stored in our KV store.--oidc-extra-scope: We explicitly ask for theemail,profile, and (most importantly)groupsscopes that we created.
Running kubectl#
This is the payoff for all that work. You open your terminal for the first time and execute kubectl get nodes. Here’s what happens:
Summary & Next Steps#
We’ve finally done it. We’ve killed the static kubeconfig.
Every single API request from kubectl is now authenticated with a short-lived, auditable JWT token. Our user identities are centralized in Vault. We can grant (and revoke!) access by simply adding or removing a user from a Vault group in Terraform. And because of the groups and email claims, we have a clear audit trail showing exactly who did what.
This completes the human access part of the story.
In the next and final part of this series, we’ll tackle the last piece: pod access. We’ll integrate the External Secrets Operator with Vault, allowing our Kubernetes pods to fetch secrets directly from Vault using their own service account tokens.