You might have heard about the recent AWS outage that caused many services to go down. To think that half of the internet relies on a single service is crazy, even if it might be the best in its field. The engineers at AWS have done many things to prevent this, such as high availability, multi-region, zones, etc., but if a critical part of it still goes down, the whole thing goes down too. Therefore, if you don’t want to give all your money and trust to a single company, you might want to explore the on-premise option, which is self-hosting.
But deploying on-premise isn’t that easy, though. You have to spend time, effort, and money to configure the system for yourself—from PC specs, network performance, and security, to virtualization. All of that is not a one-day setup. But it also gives you the power to manage everything yourself, too.
So if you want to start exploring and build an infrastructure like the one I’m currently hosting, here’s the guide for you to do so. This is the first part of the series On-Premise 101. In this part, I’ll share my whole journey from the beginning: how I acquired the hardware, the decisions I made, and finally, how I wired it all together with networking to get it ready for the software.
In this part, you’ll see me refer to Proxmox a lot and might ask, “What the hell is it?” For now, just think of it as the platform that allows me to create virtual machines. I will cover it in-depth in the next part.
The Beginning: My First SFF Server and Its Limits#
Looking back, I started this journey 3 years ago. At the time, I had an HP Prodesk 600 G4 SFF that my mother gave me; she picked it up from the warehouse at her office. It was an old computer, so I didn’t know what to do with it at the time, since I already had a PC that I could do anything with. But when I was browsing my YouTube feed, I saw a video talking about how a creator used his Synology NAS (Network Attached Storage) to replace Google Drive and help him collaborate with his video editors easily.
I thought it was so cool that you could transfer a file that big from one computer to another, without any wires, almost instantly. I checked the specs of the NAS and found out it was nothing powerful—just a bunch of HDDs and storage. That’s when I realized I could probably do all of that with my old computer, too.
If you want to read what I was doing with my old computer at that time, feel free to read my initial self-hosting story.
The specs of my PC weren’t really powerful, but its iGPU was capable enough to run Frigate (an NVR camera detection service) and Jellyfin (for video transcoding) pretty well. Later on, I tried to upgrade the PC specs , such as plugging in a graphics card for LLM models and upgrading the RAM to 16GB. But since it was a Small-Form-Factor (SFF) PC, it had limited upgrade options.
First, I tried plugging in a GTX 1030, and although it worked, I had to remove the side panel to make room for it. Second, I tried to modify the HDD holder to fit two SATA HDDs in the case, but after running it for a while, I noticed it got really hot because the two HDDs were stuck so close together. So, I was tempted to look for another PC.
Lesson Learned: Small Form Factor (SFF) PCs are a great, cheap way to start, but their limited space for upgrades (especially for GPUs and storage) means you might outgrow them fast."

The First Big Upgrade: The Lenovo P520 Workstation#
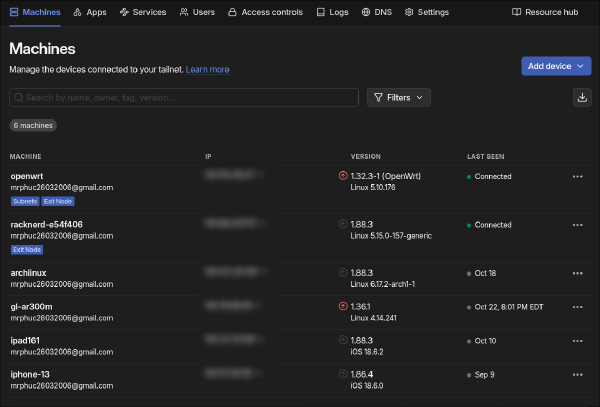
After hitting the bottlenecks of my computer and having to move to the US for my undergrad studies, I had to leave my entire homelab back in Vietnam. I could still access it via Tailscale (a VPN service, which I’ll share more about later), but the latency was really high, so I also wanted to buy a new one. Actually, at that time, ChatGPT and LLMs were also getting popular, so I wanted to get a GPU to help me “study” more in that field. Since I’m also a student, I set my budget to under $500 total.
Browsing through eBay, YouTube, and Reddit for suggestions, I settled on the Lenovo P520 as the PC. Initially, I wanted to build my own PC, but I realized that if I bought all new hardware, it would cost much more than $500, and the specs wouldn’t be powerful enough. So I wanted to choose pre-built enterprise hardware, similar to my HP Prodesk 600 G4 above. Instead of an SFF, I wanted a Full-Tower this time so that I could upgrade it more easily later on. There were options like the Dell Optiplex, HP Prodesk, HP Elitedesk, etc., but I decided to choose Lenovo because of its price-to-performance ratio. My favorite YouTuber, Hardware Haven, also released a video on this PC.
With only $274, I got:
CPU: Intel Xeon W-2123 (4 cores, 8 threads, 3.60 GHz)
RAM: 32 GB of 2666 MHz ECC DDR4
Storage: 1TB SATA SSD and 4TB HDD
And a bunch of ports and upgrade options on the motherboard

As for the GPU, there were also lots of options to choose from, but I felt the Nvidia RTX 3060 and Nvidia Tesla P40 were the strongest candidates. On one hand, the Nvidia Tesla P40 attracted me because it has 24GB of VRAM, and as you may know, VRAM capacity is king in the LLM world. But I was afraid the outdated software support would cost me in the future since it’s a card that was released nearly 10 years ago and uses the Pascal architecture. The RTX 3060, on the other hand, has 12GB of VRAM, was launched recently, and has active CUDA support, although I can’t run some of the largest LLM models on it. But with a price of only $200, and considering the fact that I might occasionally game on it, I decided to settle on the 3060.
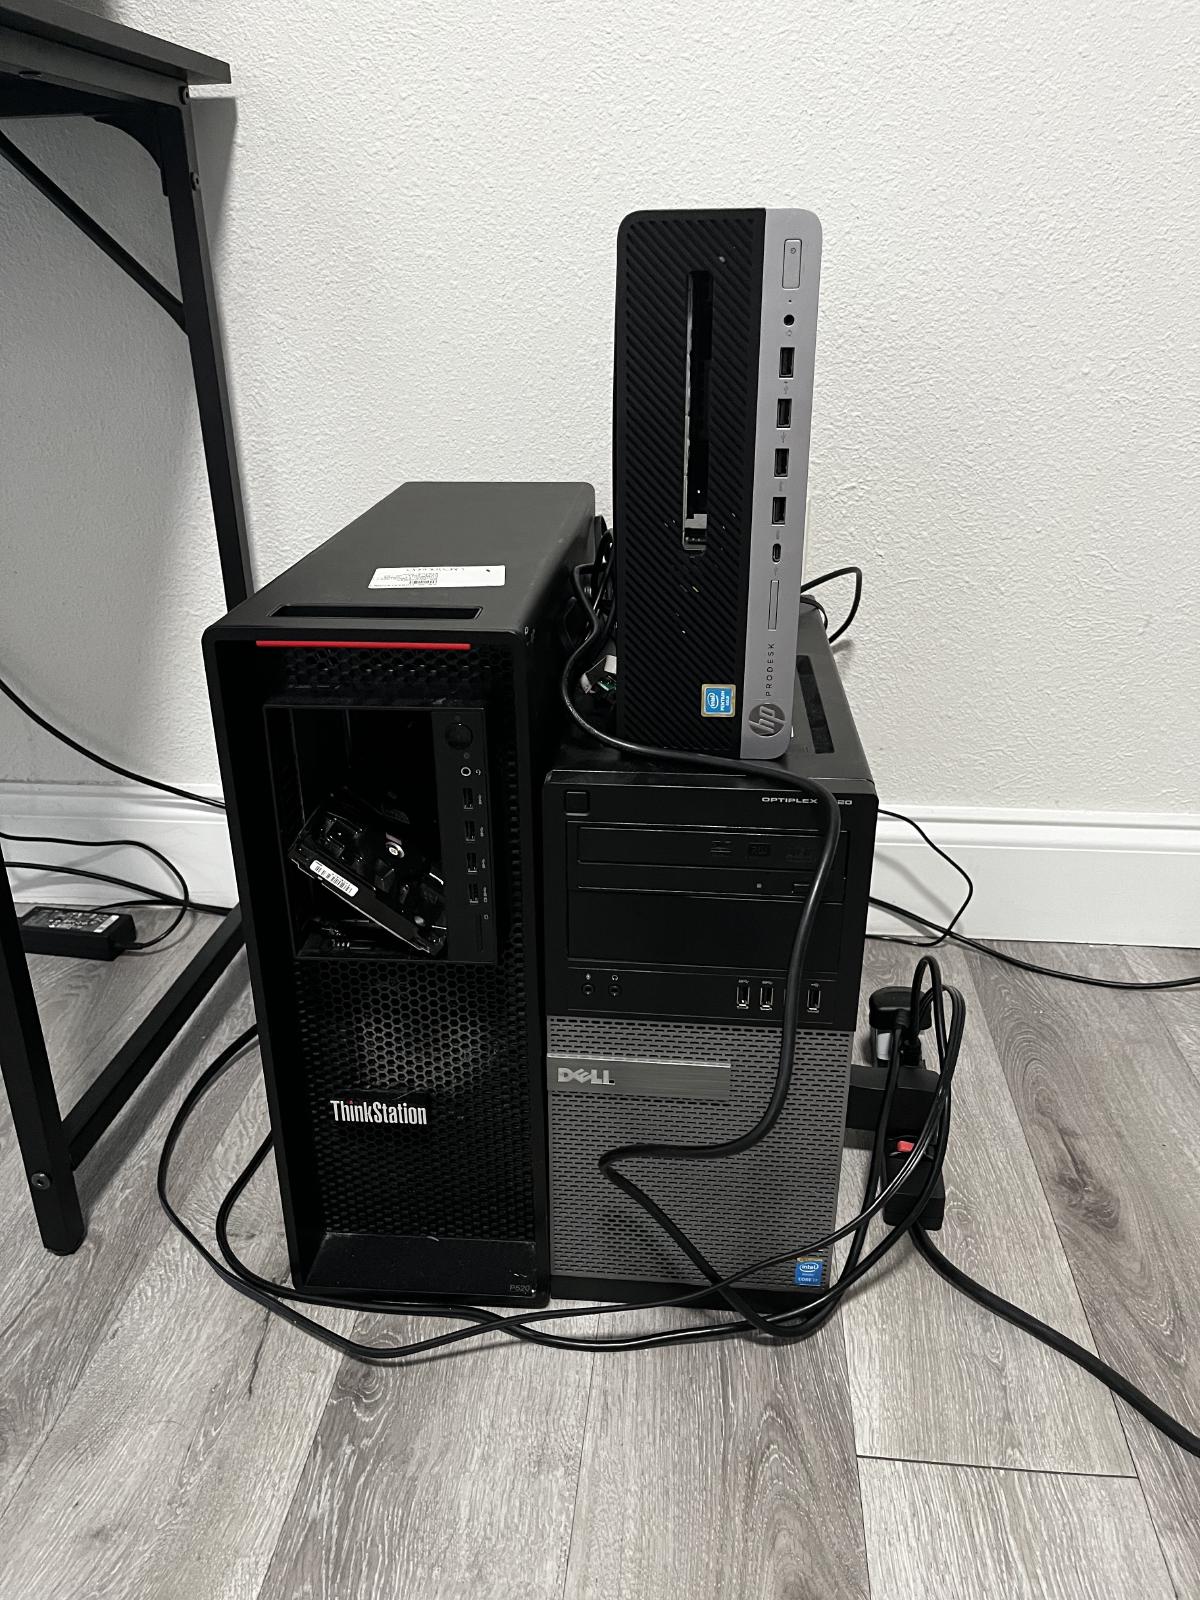
I also upgraded it to 64GB of ECC RAM with two purchases of 16GB sticks on eBay, because I also planned to use this machine as a NAS server (TrueNAS loves ECC RAM !). Later in the year, I also 3D-printed an HDD bay (the green part in the bottom right corner of the image below). This allowed me to install two additional 1TB HDDs, bringing the total NAS storage to 6TB.

The “Free PC” and My Dream of a 3-Node Cluster#
A year later, which is just recently, I also received a new PC (notice I said “received”). The story of how I got this PC is really surprising. In the summer of 2025, I needed to go back to Vietnam to visit my family. Since it was a short trip, I decided not to bring the Lenovo P520 with me because it was really clunky, and at home, I still had the HP Prodesk 600 G4. But that summer was also the first time I learned Kubernetes and I really wanted to experiment with it. So I ran those experiments on the HP Prodesk 600 G4 with multiple virtual machines, and planned to upgrade to multiple physical nodes.
When the summer ended, I planned to bring the HP Prodesk 600 G4 with me to the US. But unfortunately, after the flight, my machine would no longer boot up. Since I didn’t bring a monitor or any cables with me, I couldn’t troubleshoot the issue myself. I decided to bring it to the IT team at my school to hopefully fix it. After some back-and-forth discussion, they reached the conclusion that my machine had faulty RAM issues, and they only needed to plug out two 4 GB RAM sticks to boot it up normally.
When I went to their office to pick up my device, I saw a bunch of old Dell Optiplex machines lying around, so I just asked what they planned to do with them. They answered that they were replacing them with newer devices for the library and planned to trash or give them away. I asked if I could have one for “study reasons,” and they happily gave me a Dell Optiplex 7020, and even threw in a Dell monitor. That’s the happiest day of my entire month since the HP Prodesk decided to leave me; not only I got it relived but I also welcomed a new one to my family ! The specs of the machine are:
CPU: 3.6 GHz Intel Core i7-4790 Quad-Core
RAM: 16GB of 1600 MHz DDR3
Storage: 1TB HDD
So right now, I have 3 PCs, which is perfect for me to set up the Proxmox 3-node cluster I had dreamed of in the summer. But after a month of testing with it, I realized two of the nodes (the HP Prodesk and Dell Optiplex) constantly went offline. After unplugging and replugging the LAN cable, it would connect again, but only for a very short period. I figured this must be a networking bottleneck. And then, the upgrading journey continued.

The Bottleneck: Fixing a Failing Cluster with a Dedicated Network#
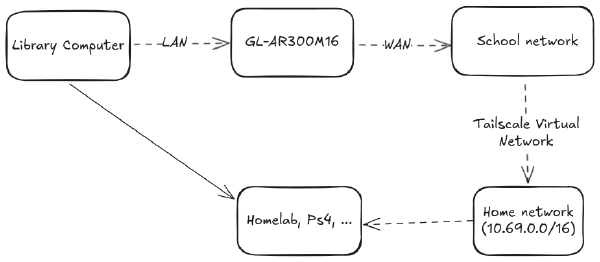
If you want to know more about the background of my network design for my homelab, feel free to read this post.
For a long time while working with my homelab, I only had a single PC at one place at the time: the HP Prodesk when I was in Vietnam, and the Lenovo P520 when I was in the US. Therefore, I always connected the LAN cable from the PC directly to the router. But since I now have 3 PCs together at one place and plan to add a PS4 for remote gaming, relying on the ports on the router wouldn’t allow me to have more than 3 devices connected at the same time. Because of this, I got myself a basic 1 Gbps switch with 8 additional ports back in the summer.

The interesting thing about a switch is that not only does it expand your LAN ports, it’s also capable of helping the computers talk directly to each other, without having to go through the “middle-man”—the router. Think of it as a simple roundabout that connects all the local streets, with the big highway being the router. You can go from one street to another easily, and you can also get on the highway if you want to. This offloads the job from the router (which is like a toll booth on the highway), improving internal throughput and performance.
However, with only one LAN port per computer, all my traffic was forced onto the same network. This means the high-speed Proxmox cluster communication (checking if nodes are online), VM traffic, and any storage traffic were all competing on the same, single 1Gbps “road.” This congestion was the root cause of my problem: critical cluster packets were being dropped, causing my nodes to think their partners were offline. Thanks for this comment from North Idaho Tom Jones on the Proxmox forum, I was able to find the solution:
IMO - some things to look at your cluster communications :
- How fast are your physical network interfaces ( 100-Meg , 1-Gig , 10-Gig , something faster ).
There is a possibility your interfaces might be busy moving I/O traffic to/from your VMs , and you don’t have the network additional I/O capacity for the cluster to communicate to the other cluster(s).
- Are you performing backups when the cluster(s) drops ?
- Do you have interface errors and/or packet drops on your physical & virtual ethernet interfaces ( and your external switch(es) ).
- What is your current I/O bandwidth rate when you drop a node in your cluster ?I have a Proxmox network with 14-Clusters and 6-external NFS systems for my VM hard disk storage. I have 10 & 40 Gig network cards. My cluster IPs and my NFS IPs do not share any IP address space with my VMs — My VMs & my Cluster IPs & my NFS IPs are on unique IP networks. I do this to keep unwanted/un-needed network chatter down to a minimum. I have never had a node drop out of the cluster , even with pushing 20+ Gig on multiple nodes in the cluster at the same time while all nodes are doing a backup at the same time.
From this, I decided to upgrade my network infrastructure again, finding new network cards to expand the LAN ports on my PCs. I initially looked at 10 Gig, but after seeing the price of both the network cards and the switch, I immediately retreated. Although my switch is only 1 Gig, I didn’t plan to replace it right now because even 2.5 Gig switches are so expensive. So I opted for 2.5 Gig network cards for each computer, with the plan to upgrade the switch later.
At first, I was just looking for the cheapest network card. After searching on Amazon, I found this one, which is only $8 for a 2.5 Gig PCIe network card. I immediately bought 3 of them. When they arrived, I found out that the PCIe connection here is an M+B key, which is a totally different connector than an NVME drive or a standard PCI x1 slot. It’s a rare port for a PC to have, as it’s usually used for WiFi cards or Coral TPU accelerators.

Needless to say, only the HP Prodesk had this port, and it didn’t even look nice when plugged in (see the extra cord that’s totally detached from the case in the image above). So I had to return two of the network cards and buy two more. This time, I learned that I needed to find a specific PCI x1 network card, so I filtered carefully and bought this one. After they arrived, they fit nicely into the cases.

The next step, after wiring everything and connecting it to the switch, was to go into Proxmox to verify the PCs recognized the cards. Then I created a new subnet (192.168.69.0/24) just for these 3 PCs so they could talk to each other directly for cluster communication. After that, I changed the /etc/hosts file on each node so they would use these new IPs to communicate with each other. And after everything was done, voila! The cluster is now stable, and each node has two different addresses: one for the main network (via the router) and one for direct, high-speed communication with other nodes.

What’s Next: Building the Software Stack (NAS, Kubernetes, and ArgoCD)#
And with that, the hardware journey is complete. It’s been a fantastic learning experience, evolving from a single, hand-me-down HP Prodesk to a powerful 3-node Proxmox cluster.
This process taught me some valuable lessons:
Start with what you have: That first SFF PC was the perfect, low-cost entry point into self-hosting.
Plan for your bottlenecks: I quickly hit the physical limits of SFF (power, cooling, and PCIe slots). Moving to a full-tower workstation like the
Lenovo P520was the right call, giving me room for a real GPU and more storage.Networking is critical for clusters: A “stable” cluster isn’t just about the PCs; it’s about the network connecting them. My nodes kept dropping offline due to network congestion on a single 1Gbps link. Adding dedicated 2.5GbE cards for a private cluster subnet (
192.168.69.0/24) made the cluster perfectly stable.
Now that the physical foundation is laid, it’s time to build on top of it. In the next part of this series, I’ll dive into the software that brings this hardware to life. We’ll cover:
Creating a ZFS-based NAS: How I’m using TrueNAS (or Proxmox’s built-in ZFS) to manage my 6TB of storage.
Spinning up the Kubernetes Cluster: We’ll provision the VMs that will form our 3-node k8s cluster using Terraform and Ansible.
Automating Everything with GitOps: Finally, I’ll show you how I use ArgoCD to automatically deploy and manage all my applications (Jellyfin, Frigate, and more) on Kubernetes.
Stay tuned!