I’m the kind of person who will happily spend 10 hours building an automation script just to save 10 minutes of manual work every day. If that sounds like you, you’re in the right place.
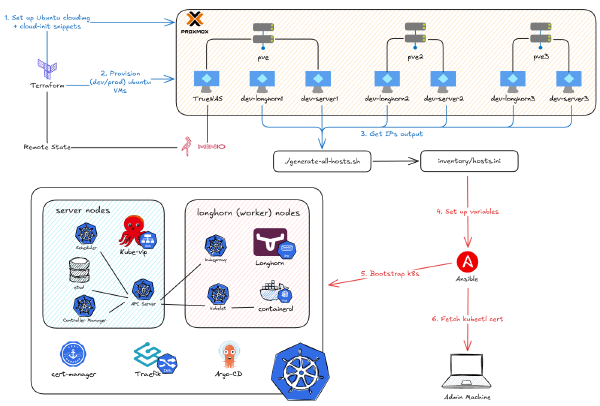
After covering the foundations of our hypervisor and storage platform, it’s time to move on to the most interesting part of this series: provisioning a Kubernetes cluster on Proxmox. This means creating a bunch of VMs, and I refuse to do that manually. Luckily, I have learned Terraform and Ansible somewhat enough to be able to create this project below to automate it all.
This post is first part of my deep dive on the project, focusing on how I use Terraform to create a repeatable, automated, and scalable VMs cluster on Proxmox, all with a single command. If you want to see how this project performs in action, you can watch the video below.
Why Automate? The Case for IaC with Terraform#
“But what is Terraform?” you might ask. Again, we need to consider the core problem it solves to truly appreciate it.
Before Terraform, and before the “cloud” even existed, people deployed infrastructure by manually creating VMs with repeated configurations (CPU, RAM, network, firewall) and then SSH into each machine to run commands,or if they were fancy, a bash script. This did the job, but doing it manually was error-prone, time-consuming, and a nightmare to document.
The “cloud” was born to help solve this: it’s still someone’s computer, but those computers are now abstracted with many services on top, so we no longer need to build the infrastructure ourselves and can create VMs faster. Heck, we might not need to create VMs; instead, we just need to write a Dockerfile, or even just the function of the code, to get it deployed directly. However, we still often need to manually log in to a website and create VMs through a clunky UI.
That’s where Terraform comes in. It’s an open-source, Infrastructure as Code (IaC) tool from HashiCorp that lets you define and provision infrastructure using a declarative configuration language called HCL. It allows you to build, change, and manage infrastructure safely and efficiently. By writing code to describe your desired end state, Terraform automates the process of creating, updating, and destroying infrastructure, reducing manual effort and improving consistency.

Because your infrastructure is now code, it inherits awesome features like version history (via Git) and a documented process. If something goes wrong, you can tear down and bring up the entire infrastructure again with just two commands: terraform destroy and terraform apply. If someone new joins the team, they can easily get a grasp of the infrastructure by reading the code, without endless clicking on a cloud provider’s website.
By using Terraform, I can easily create tons of VMs on Proxmox and show you exactly what I’m doing.
My Terraform Blueprint: Project Structure & Principles#
In the image above, we see 4 files on the left. These also represent the 4 primary components of a Terraform project: providers, variables, state, and instances (resources/modules).
Before diving into each component, let’s establish the core design principles that keep our Terraform code from becoming a messy nightmare (otherwise, it’s no better than the clunky UI):
- Separation of Concerns: Each file should has a distinct and clear purpose.
- Variable-Driven Configuration: The infrastructure’s composition (how many nodes, their IPs, etc.) is defined in variables file, not hardcoded in the logic.
- Modularity: Reusable components (like a virtual machine) are encapsulated in modules.
- Environment Isolation: Configurations for different environments (like dev and prod) are kept separate.
To give you a map of what I’m doing, here’s my Terraform file structure:
.
├── create_user_config.tf
├── download_img.tf
├── env
│   ├── dev
│   │   ├── backend.hcl
│   │   ├── k8s_nodes.json
│   │   ├── longhorn_nodes.json
│   │   └── main.tfvars
│   └── prod
│       ├── backend.hcl
│       ├── k8s_nodes.json
│       ├── longhorn_nodes.json
│       └── main.tfvars
├── modules
│   └── vm
│       ├── main.tf
│       ├── outputs.tf
│       └── variables.tf
├── provider.tf
├── variables.tf
└── vms.tf
Connecting to Proxmox and S3#
provider.tf: Defining Our Connections#
Providers are plugins that enable Terraform to interact with various platforms (AWS, Azure, GCP) and services (Kubernetes, DNS, etc.). They understand the resource types and make the API calls to create, read, update, and delete them.
In my case, I need to spin up VMs on Proxmox, so I looked for a provider that integrates with it. There are two prominent ones: Telmate/terraform-provider-proxmox and bpg/terraform-provider-proxmox. The one from telmate has been around for a long time but is limited in functionality. The one from bpg is newer and allows you to manage every aspect of a Proxmox environment. Thus, I opted for bpg.
Later, I’ll introduce the concept of “remote state,” which uses a backend provider. I’ll be using an S3-compatible object storage (Minio), so I’ll define that as well. Enough talk, here’s my provider.tf file.
terraform {
  required_version = ">= 1.6.6"
  required_providers {
    `Proxmox` = {
      source  = "bpg/proxmox"
      version = "0.77.1"
    }
  }
  backend "s3" {}
}

provider "proxmox" {
  endpoint = var.proxmox_endpoint
  insecure = var.proxmox_insecure
  min_tls  = var.proxmox_min_tls
  username = var.proxmox_username
  password = var.proxmox_password
}
Notice the version constraint - this is a critical best practice that locks your project to a specific provider version, preventing unexpected breaking changes from automatic updates.
terraform.tfstate: Using a Remote Backend#
Terraform state is a crucial component that stores a mapping of your configured resources to the real-world objects that have been created. It’s how Terraform knows what it manages.
There are two primary ways to store state: local (a terraform.tfstate file on your computer) and remote (on an online storage service like S3). The local state is fine for solo experiments but is disastrous for teams where multiple people are trying to make changes. What happens is Terraform can’t match the desired state (your code) with the actual state (on the server) because there’s no single source of truth.
Therefore, I decided to use a remote backend. The credentials for it are handled by the env/dev/backend.hcl file below.
access_key                  = "terraform"
secret_key                  = "QmwRghG9X80kC%"
bucket                      = "terraform"
key                         = "dev.tfstate"
region                      = "us-east-1"

# --- MinIO Specific Settings ---

# The URL of your MinIO server
endpoints = {
  s3 = "http://10.69.1.102:9000"
}

# Use path-style addressing (e.g., http://minio/bucket/key)
use_path_style = true

# Skip AWS-specific validation checks
skip_credentials_validation = true  # Skip AWS related checks and validations
skip_requesting_account_id = true
skip_metadata_api_check = true
skip_region_validation = true
What’s more, using remote state, I can now use my Terraform code for multiple backends. I just need to keep my two backends (dev and prod) separate and I can decide which environment to initialize Terraform with by running:
terraform init -reconfigure -backend-config=env/dev/backend.hcl
# For production:
# terraform init -reconfigure -backend-config=env/prod/backend.hcl
This keeps your core configuration clean and environment-agnostic. It securely stores your state in a remote, centralized location, enabling collaboration and preventing state file loss.
backend.hcl: Using Minio for Remote State#
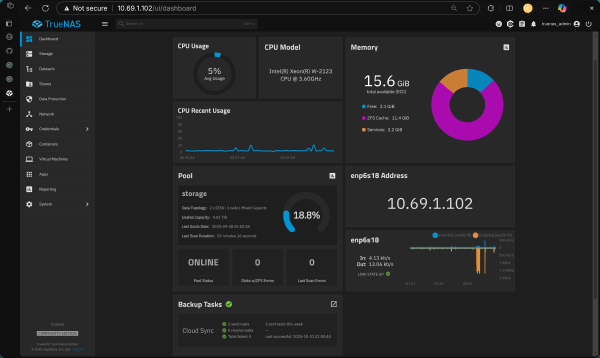
To get the credentials for the backend.hcl file, you first need to install Minio on your storage platform (in my case, TrueNAS).
minio-console. This is because we need to create an IAM user for terraform and get its credentials, and the primary minio container UI has removed some of those features. The minio-console brings those features back.
The “Inputs”: Variables, tfvars, and JSON#
Next up are variables, which are the parameters for your Terraform configuration. They allow you to create flexible and reusable code by separating the “what” (the resource logic) from the “how” (the specific values).
variables.tf: Defining the “API”#
This file acts as the “API” for the entire project. It defines every possible input, from provider credentials to VM specs, and sets optional default values. This file makes the project self-documenting.
variable "env" {
  description = "Environment name (e.g., dev, prod)"
  type        = string
}

variable "proxmox_endpoint" {
  type        = string
  description = "Proxmox API endpoint (e.g., https://your-proxmox-ip:8006)"
}
variable "proxmox_insecure" {
  type        = bool
  description = "Skip TLS verification"
  default     = true
}
variable "proxmox_min_tls" {
  type        = string
  description = "Minimum TLS version"
  default     = "1.3"
}
variable "proxmox_username" {
  description = "Proxmox username"
  type        = string
}
variable "proxmox_password" {
  description = "Proxmox password"
  type        = string
  sensitive   = true
}
variable "proxmox_ssh_public_key" {
  description = "SSH public key for VM access"
  type        = string
}

variable "vm_node_name" {
  description = "Proxmox node where VMs are created"
  type        = string
}
variable "vm_datastore_id" {
  description = "Proxmox datastore ID where snippets cloud img are stored"
  type        = string
}
variable "vm_bridge" {
  description = "Network bridge used for VM network"
  type        = string
}
variable "vm_timezone" {
  description = "Timezone for the VM"
  type        = string
}
variable "vm_username" {
  description = "Username for the VM template"
  type        = string
}
variable "vm_ip_gateway" {
  description = "Gateway for Kubernetes VMs"
  type        = string
}
variable "dns_server" {
  description = "DNS server for Kubernetes VMs"
  type        = string
}

variable "k8s_cpu_cores" {
  description = "Number of CPU cores per VM"
  type        = number
}
variable "k8s_cpu_type" {
  description = "CPU type for VM"
  type        = string
}
variable "k8s_memory_mb" {
  description = "Memory size in MB per VM"
  type        = number
}
variable "k8s_datastore_id" {
  description = "k8s datastore ID where VM disks are stored"
  type        = string
}
variable "k8s_disk_size_gb" {
  description = "Disk size in GB for VM disk"
  type        = number
}

variable "longhorn_cpu_cores" {
  description = "Number of CPU cores per VM"
  type        = number
}
variable "longhorn_cpu_type" {
  description = "CPU type for VM"
  type        = string
}
variable "longhorn_memory_mb" {
  description = "Memory size in MB per VM"
  type        = number
}
variable "longhorn_datastore_id" {
  description = "longhorn datastore ID where VM disks are stored"
  type        = string
}
variable "longhorn_disk_size_gb" {
  description = "Disk size in GB for VM disk"
  type        = number
}

locals {
  k8s_nodes      = jsondecode(file("${path.root}/env/${var.env}/k8s_nodes.json"))
  longhorn_nodes = jsondecode(file("${path.root}/env/${var.env}/longhorn_nodes.json"))
}
main.tfvars: Setting Environment Values#
While variables.tf defines the inputs, this file provides the concrete values for a specific environment. The reason I separate my *.tfvars files into env/dev/ and env/prod/ is the same as for the backend state: it allows me to spin up a completely new environment just by creating a new directory. You can tell Terraform which one to use like this:
terraform apply -var-file="env/dev/main.tfvars"
# For production:
# terraform apply -var-file="env/prod/main.tfvars"
Here’s an example of env/dev/main.tfvars. The variable names here must exactly match the names in variables.tf.
# Environment name
env = "dev"

# `Proxmox` API details - PLEASE FILL THESE IN
proxmox_endpoint       = "https://10.69.1.1:8006/"
proxmox_username       = "root@pam"
proxmox_password       = "Phuc@2006"
proxmox_ssh_public_key = "/home/felix/.ssh/id_ed25519.pub" # Absolute path of your ssh public key on your machine

# General VM settings - PLEASE REVIEW AND ADJUST
vm_node_name    = "pve"     # `Proxmox` node where VMs are created
vm_datastore_id = "truenas" # storage for downloading cloud img, storing snippets, etc.
vm_bridge       = "vmbr0"
vm_timezone     = "America/New_York"
vm_username     = "ubuntu"
vm_ip_gateway   = "10.69.0.1"
dns_server      = "1.1.1.1"

# k8s cluster settings
k8s_cpu_cores    = 2
k8s_cpu_type     = "x86-64-v2-AES"
k8s_memory_mb    = 4096
k8s_disk_size_gb = 64
k8s_datastore_id = "local-lvm"

# longhorn cluster settings
longhorn_cpu_cores    = 2
longhorn_cpu_type     = "x86-64-v2-AES"
longhorn_memory_mb    = 2048
longhorn_disk_size_gb = 300
longhorn_datastore_id = "local-lvm"
k8s_nodes.json: A Dynamic Node Inventory#
locals {
  k8s_nodes      = jsondecode(file("${path.root}/env/${var.env}/k8s_nodes.json"))
  longhorn_nodes = jsondecode(file("${path.root}/env/${var.env}/longhorn_nodes.json"))
}
You might have noticed the locals block at the end of variables.tf. This block dynamically loads the correct node inventory based on the env variable and makes it available to the rest of your configuration files. For example, it will read env/dev/k8s_nodes.json, which is the source of truth for my Kubernetes nodes. It defines each node’s name, ID, and IP address. To scale the cluster, you simply add a new entry to it.
{
  "dev-server1": {
    "vm_id": 111,
    "node": "pve",
    "role": "servers",
    "address": "10.69.1.111/16"
  },
  "dev-server2": {
    "vm_id": 112,
    "node": "pve2",
    "role": "servers",
    "address": "10.69.1.112/16"
  },
  "dev-server3": {
    "vm_id": 113,
    "node": "pve3",
    "role": "servers",
    "address": "10.69.1.113/16"
  }
}
Not only does this make it easy to define multiple nodes, but it also helps Ansible (in the next part) read this same file to configure the IPs.
The “Blueprint”: Assembling the Cluster#
Now that we have our variables configured, Terraform can talk to our infrastructure. The next step is to define what to say.
These are the .tf files that contain the logic - the blueprint for your infrastructure. They define resources, call modules, and orchestrate the entire deployment.
download_img.tf: Acquiring the Base Image#
resource "proxmox_virtual_environment_download_file" "ubuntu_cloud_image" {
  content_type = "iso"
  datastore_id = var.vm_datastore_id
  node_name    = var.vm_node_name
  file_name    = "${var.env}-noble-server-cloudimg-amd64.img"

  url = "https://cloud-images.ubuntu.com/noble/current/noble-server-cloudimg-amd64.img"
}
This file has one job: download the Ubuntu cloud image from the internet and store it in Proxmox. The proxmox_virtual_environment_download_file resource from the bpg/proxmox provider handles this, ensuring the base image is available before any VMs are created. Its output ID is used later to specify the base disk for the VMs installation.
This ISO file is special because you can modify the VM configuration directly with the cloud-init bundle with it.
Result:
create_user_config.tf: Preparing Cloud-Init#
data "local_file" "ssh_public_key" {
  filename = var.proxmox_ssh_public_key
}

resource "proxmox_virtual_environment_file" "user_data_cloud_config" {
  content_type = "snippets"
  datastore_id = var.vm_datastore_id
  node_name    = var.vm_node_name

  source_raw {
    data = <<-EOF
    #cloud-config
    host-name: ubuntu_cloud_image
    timezone: ${var.vm_timezone}
    users:
      - default
      - name: ${var.vm_username}
        groups:
          - sudo
        shell: /bin/bash
        ssh_authorized_keys:
          - ${trimspace(data.local_file.ssh_public_key.content)}
        sudo: ALL=(ALL) NOPASSWD:ALL
    package_update: true
    packages:
      - qemu-guest-agent
      - net-tools
      - curl
      - cryptsetup
    runcmd:
      - systemctl start qemu-guest-agent
    EOF

    file_name = "user-data-cloud-config.yaml"
  }
}

resource "proxmox_virtual_environment_file" "meta_data_cloud_config" {
  for_each     = merge(local.k8s_nodes, local.longhorn_nodes)
  content_type = "snippets"
  datastore_id = var.vm_datastore_id
  node_name    = var.vm_node_name

  source_raw {
    data = <<-EOF
    #cloud-config
    local-hostname: ${each.key}
    EOF

    file_name = "${each.key}-meta-data-cloud-config.yaml"
  }
}
This is one of the most important files for automation. It creates the configuration “snippets” that cloud-init will use to configure the VMs on their first boot.
user_data_cloud_config: This is a generic configuration applied to all VMs. It sets the timezone, creates a default user (ubuntu), injects your SSH public key for passwordless access, and installs essential packages likeqemu-guest-agent.meta_data_cloud_config: This creates a specific metadata file for each VM. It iterates through the node maps loaded inlocals.tfand creates a snippet that sets the correct hostname for each machine (e.g.,dev-server1).
Result:
modules/vm/: The Reusable VM “Factory”#
This directory encapsulates all the logic for creating a single Proxmox VM. It’s a Terraform module—a reusable package of configuration, much like a “class” in object-oriented programming.
variables.tf: This is the “order form” for the factory. It defines all the parameters needed to create one VM, such as its name, CPU cores, memory, IP address, etc.main.tf: This is the “assembly line.” It contains theproxmox_virtual_environment_vmresource block. It takes all the variables and uses them to configure the VM’s properties, from its CPU and memory to its disk and network settings.outputs.tf: This defines the “shipping label,” outputting the finalvm_idof the created machine.
# main.tf

terraform {
  required_providers {
    `Proxmox` = {
      source  = "bpg/proxmox"
      version = "0.77.1"
    }
  }
}

resource "proxmox_virtual_environment_vm" "vm" {
  name      = var.name
  node_name = var.node_name
  vm_id     = var.vm_id

  agent {
    enabled = true
  }

  stop_on_destroy = true
  machine         = "q35"
  bios            = "ovmf"
  description     = "Cloud-Init ready Kubernetes template managed by Terraform"

  cpu {
    cores = var.cpu_cores
    type  = var.cpu_type
  }

  memory {
    dedicated = var.memory_mb
  }

  efi_disk {
    datastore_id = var.datastore_id
    type         = "4m"
  }

  disk {
    datastore_id = var.datastore_id
    file_id      = var.disk_file_id
    interface    = "virtio0"
    iothread     = true
    discard      = "on"
    size         = var.disk_size_gb
    ssd          = true
  }

  network_device {
    bridge = var.bridge
  }

  initialization {
    dns {
      servers = [var.dns_server]
    }

    ip_config {
      ipv4 {
        address = var.ip_address
        gateway = var.ip_gateway
      }
    }

    user_data_file_id = var.user_data_file_id
    meta_data_file_id = var.meta_data_file_id
  }
}
vms.tf: Orchestrating the Build with for_each#
Now for the magic. All that setup—the variables, the JSON file, the module—was for this. This one file is our master orchestration file. Watch how we use for_each to loop through our JSON node list and pass the values to our VM module. This is how we create 12 (or 100) VMs as easily as one.
module "k8s_nodes" {
  source = "./modules/vm"

  for_each = local.k8s_nodes

  name              = each.key
  node_name         = each.value.node
  vm_id             = each.value.vm_id
  cpu_cores         = var.k8s_cpu_cores
  cpu_type          = var.k8s_cpu_type
  memory_mb         = var.k8s_memory_mb
  datastore_id      = var.k8s_datastore_id
  disk_file_id      = proxmox_virtual_environment_download_file.ubuntu_cloud_image.id
  disk_size_gb      = var.k8s_disk_size_gb
  bridge            = var.vm_bridge
  dns_server        = var.dns_server
  ip_address        = each.value.address
  ip_gateway        = var.vm_ip_gateway
  user_data_file_id = proxmox_virtual_environment_file.user_data_cloud_config.id
  meta_data_file_id = proxmox_virtual_environment_file.meta_data_cloud_config[each.key].id
}

module "longhorn_nodes" {
  source = "./modules/vm"

  for_each = local.longhorn_nodes

  name              = each.key
  node_name         = each.value.node
  vm_id             = each.value.vm_id
  cpu_cores         = var.longhorn_cpu_cores
  cpu_type          = var.longhorn_cpu_type
  memory_mb         = var.longhorn_memory_mb
  datastore_id      = var.longhorn_datastore_id
  disk_file_id      = proxmox_virtual_environment_download_file.ubuntu_cloud_image.id
  disk_size_gb      = var.longhorn_disk_size_gb
  bridge            = var.vm_bridge
  dns_server        = var.dns_server
  ip_address        = each.value.address
  ip_gateway        = var.vm_ip_gateway
  user_data_file_id = proxmox_virtual_environment_file.user_data_cloud_config.id
  meta_data_file_id = proxmox_virtual_environment_file.meta_data_cloud_config[each.key].id
}
For every entry in local.k8s_nodes (and longhorn_nodes) variables, this file calls the ./modules/vm module, passing in the specific configuration. It combines:
- The node-specific data from the JSON file (
each.key,each.value.address). - The generic VM settings from
main.tfvars(var.k8s_cpu_cores). - The IDs of the resources created in other files (the downloaded image and the cloud-init snippets).
Result:
Conclusion: The 12-Hour, 12-Minute Payoff#
And with that, I’ve successfully created 12 VMs on Proxmox, all with specific, defined configurations, just by running terraform apply.
You could say I took 12 hours to automate a 12-minute job, and you’d be right. But I’m still incredibly proud of this work. Now, I can spin down the entire cluster and spin it back up again, at will, in minutes. What’s more, I can scale up or change the configuration for all my VMs just by editing a single JSON file.
That is the power of well-designed Infrastructure as Code.