People are often scared to learn Kubernetes because it’s difficult to set up an environment to play around with. Sure, you can use a project like minikube to learn on your own, but running it on your laptop seems limited, and you may not get to experience all the awesome features Kubernetes offers (remember, it was born for high availability). Or, if you have money, you can use a managed Kubernetes cluster from one of the cloud providers. Often, they’ve abstracted away so many things under the hood that you only need to learn kubectl and you’re good to go.
However, if you encounter issues, you might find it hard to debug those services, likely because you just don’t have to touch the internals frequently. I mean, who in their right mind would break things on a cluster frequently and debug it just for the sake of learning?
Well, I do. But since I already have my own homelab, I decided to experiment on that rather than on a managed cloud cluster.
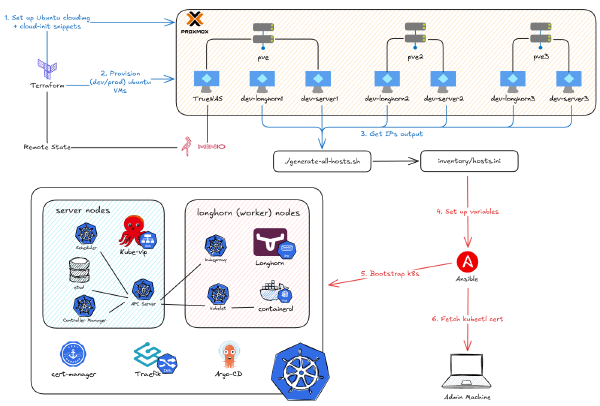
What’s more, this also gives me the option to properly deploy Kubernetes from the ground up. I also want to automate all the steps I’ve gone through so that I can reverse something and run it all back if it goes wrong. After creating 12 VMs with Terraform in the previous part, this post is the second part of my deep dive on the project below, focusing on how I use Ansible to automate the deployment of Kubernetes on those VMs.
Video demo:
My K8s Flavor#
Before we dive in, I have to say that we are not going to bootstrap a whole Kubernetes cluster from the ground up as detailed in the project below. However, I absolutely recommend anyone who wants to learn it from the beginning to go through this project. The reason I’m not using it is that it’s not recommended for daily usage. Instead, I will use RKE2, which is more production-ready but still offers a great learning experience.
What is RKE2? (according to the documentation)#
RKE2 is Rancher’s enterprise-ready, next-generation Kubernetes distribution. It’s also been known as RKE Government. It is a fully conformant Kubernetes distribution that focuses on security and compliance.
To meet these goals, RKE2 does the following:
- Provides defaults and configuration options that allow clusters to pass the CIS Kubernetes Benchmark v1.7 or v1.8 with minimal operator intervention
- Enables FIPS 140-2 compliance
- Regularly scans components for CVEs using trivy in our build pipeline
How is this different from RKE or K3s?#
RKE2 combines the best of RKE1 and K3s.
From K3s, it inherits usability, ease of operation, and a simple deployment model. From RKE1, it inherits close alignment with upstream Kubernetes. Where K3s diverged from upstream to optimize for edge deployments, RKE2 stays closely aligned.
Importantly, RKE2 does not rely on Docker as RKE1 does. RKE1 used Docker to deploy control plane components. RKE2 launches control plane components as static pods, managed by the kubelet, and uses containerd as its embedded container runtime.
RKE2 Architecture#

RKE2 brings together several Open Source technologies to make this work:
- K8s
- API Server: The central hub. All cluster communication goes through here.
- Scheduler: Decides which node a new pod should run on.
- Controller Manager: The “thermostat.” Works to make the actual state match the desired state (e.g., “I need 3 pods”).
- Kubelet: The agent on each node. Takes orders from the API Server and tells
containerdwhat to do. - Proxy: A network proxy on each node that manages virtual IPs for services.
- etcd: The cluster’s database. Stores the “desired state” of everything.
- CoreDNS: The internal DNS server for the cluster.
- cri: An API that lets
kubelettalk to different container runtimes. - containerd: The container runtime that manages the complete container lifecycle.
- runc: The low-level tool that actually creates and runs the containers
- CNI: The plugin system for pod networking (RKE2 uses
canalby default). - Traefik: The default Ingress controller (routes external traffic into the cluster).
- Metrics Server: Collects resource usage data (CPU/RAM).
- Helm & Helm Controller: A package manager. The
helm-controllercan automatically apply any charts found in/var/lib/rancher/rke2/server/manifests.
A 30-Second Kubernetes Refresher#
To understand Kubernetes objects broadly, here’s a concise table:
| Category | Object | Purpose & Explanation |
|---|---|---|
| Workloads | Pod | The smallest deployable unit. Holds one or more containers that share a network and storage. |
| (Objects that run or manage containers) | ReplicaSet | Ensures a specific number (“X”) of identical pods are always running. (You rarely use this directly). |
| Deployment | Manages the lifecycle of stateless apps. Defines a desired state and manages rolling updates via ReplicaSets. | |
| StatefulSet | Manages stateful apps (like databases) by giving each pod a stable, unique identity (e.g., db-0) and storage. | |
| DaemonSet | Ensures one pod runs on every (or specific) node, typically for node-level agents like logging or monitoring. | |
| Job | Runs a one-time task to completion by creating pods that run once and then stop. | |
| CronJob | Runs a Job on a schedule (e.g., a nightly backup). | |
| Networking | Service | Provides a stable network endpoint (IP/name) for a group of pods, acting as an internal load balancer and for service discovery. |
| Storage | PersistentVolume (PV) | The actual “supply” of storage (e.g., a cloud disk) made available to the cluster by an administrator. |
| PersistentVolumeClaim (PVC) | A user’s “request” for storage that claims an available PersistentVolume (PV). | |
| Configuration | ConfigMap | Stores non-sensitive configuration data (like config files or env variables) as key-value pairs to inject into pods. |
| Secret | Stores sensitive data (like passwords, API keys, or certificates) securely, to be injected into pods. | |
| Organization | Namespace | A “virtual cluster” that isolates resources between different teams, projects, or environments (e.g., dev, prod). |
To sum up how all of that comes into play, here’s a nice diagram of how a pod is created, drawn by rajeshsgr.
After introducing RKE2 and some basic Kubernetes knowledge, let’s move on to deploying it with Ansible.
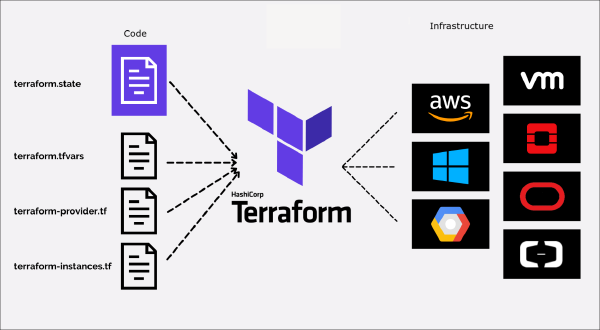
The Elephant in the Room: Terraform vs. Ansible#
Alright, let’s address the big elephant in the room. “I already have one powerful automation tool like Terraform, why on earth would I add another tool like Ansible?”
It’s a fair question. Both are “Infrastructure as Code,” right? You could say that, but they don’t solve the same core problem. The classic analogy is: Terraform builds the house, and Ansible furnishes it. You need both because they are masters of two different domains: provisioning and configuration.
Let’s be clear on what Terraform rocks at. It’s brilliant at creating, updating, and destroying the “metal.” But once that server is “on,” Terraform’s job is pretty much done. Don’t attempt to use it for configuration. Sure, you can use remote-exec provisioners to run shell scripts. But it’s awful, hard to debug, and if it fails, Terraform might “taint” the resource and want to destroy it. It has no logic for “rolling updates” or complex app deployments.
This is where Ansible steps in. Ansible is an automation and configuration management tool. Its job is to take the servers Terraform built and make them do something useful. Ansible is (mostly) procedural. You write a Playbook (in simple YAML) that lists a set of tasks to run, in order. It’s agentless (it just uses SSH) and it doesn’t care about “state” in the same way Terraform does. It just runs your tasks.
My Automation Workflow: From Terraform to Ansible#
Therefore, the best practice is to combine both tools. The workflow to deploy the Kubernetes cluster on Proxmox looks like this:

Phase 1: Terraform Builds the House (Covered in Part 4)#
Download a cloud-init-ready image.
Define specs (CPU, memory, disk).
Use
cloud-initto set the static IP and inject your public SSH key.Create the VMs (three types:
servers,agents,longhornnodes).serversare for the control plane,agentsare worker nodes, andlonghornnodes are worker nodes configured with lots of storage to act as our high-availability persistent storage.
The Handoff: Our “Terraform-to-Ansible” Glue#
My k8s_nodes.json file (covered in the last part) from Terraform is our “source of truth.” I run a simple script that parses that JSON and auto-generates the inventory/hosts.ini file that Ansible needs. This means if I add a node in Terraform, it automatically gets configured by Ansible on the next run.
./scripts/generate-all-hosts.sh dev
I also run a cleanup script to clear old SSH keys, which prevents “host key” errors:
./scripts/clean-up-ssh-known-hosts.sh dev
Phase 2: Ansible Furnishes the House#
Prepare all nodes (enable IP forwarding, create directories) & Download RKE2.
Bootstrap RKE2 on the
serversnodes.Join the
agentsandlonghornnodes to the cluster.Deploy kube-vip for a high-availability VIP for the
serversand to provide LoadBalancer IPs forServices.Deploy Helm applications dynamically from a centralized configuration (
helm.yaml), including:- cert-manager for SSL certificate management
- traefik as our ingress controller
- longhorn for high-availability persistent storage
- argo-cd for GitOps deployment of all our applications (covered in the next part)
- Additional apps like cloudnative-pg, external-secrets, and more
Fetch the
kubectlconfig from the server to our local machine.
Here’s the overview of my Ansible structure based on that workflow. ansible.cfg sets default CLI arguments. collections/requirements.yaml lists required Ansible plugins. The inventory directory stores our variables (like the VM IPs and Helm app configurations). site.yaml is the main playbook that calls the modular playbooks (Roles) located in the roles directory.
.
├── ansible.cfg
├── collections
│   └── requirements.yaml
├── inventory
│   ├── group_vars
│   │   └── all
│   │       ├── helm.yaml      # Centralized Helm apps config
│   │       └── main.yaml      # Cluster variables
│   └── hosts.ini
├── roles
│   ├── add_agent
│   ├── add_server
│   ├── apply_kube_vip
│   ├── deploy_helm_apps       # Dynamic Helm deployment
│   └── download_rke2
└── site.yaml
Setting the Stage: Ansible Inventory and Variables#
As introduced above, here’s the inventory/hosts.ini file. It contains the IPs of the machines that Ansible will target. Notice it has three categories (agents, longhorn, servers) and one big group-of-groups: rke2:children. This is needed to specify whether a task should run on a specific group or on all machines. This file is auto-generated by the script in the handoff phase.
[agents]
dev-agent1 ansible_host=10.69.1.181
dev-agent2 ansible_host=10.69.1.182

[longhorn]
dev-longhorn1 ansible_host=10.69.1.114
dev-longhorn2 ansible_host=10.69.1.115
dev-longhorn3 ansible_host=10.69.1.116

[servers]
dev-server1 ansible_host=10.69.1.111
dev-server2 ansible_host=10.69.1.112
dev-server3 ansible_host=10.69.1.113

[rke2:children]
agents
longhorn
servers
Additionally, inventory/group_vars/all.yaml is our main variables config file.
ansible_user: ubuntu
rke2_version: "v1.32.3+rke2r1"
arch: amd64 # type of machine, raspberry pi use arm64
rke2_token: dev # for authenticate & add nodes in cluster
env: dev
vip: "10.69.1.110" # for virtual ip of the servers
vip_cidr: "16"
vip_lb_range: "10.69.1.117-10.69.1.119" # load balancer ip range
ssl_local_domain: dev.phuchoang.sbs
ssl_cloudflare_api_token:
ssl_email: [email protected]
ssl_ingress_ip: "10.69.1.117" # default traefik ip, must be in the range above
The Master Plan: Our site.yaml Playbook#
As introduced earlier, site.yaml is the master playbook that calls the child roles. It sources the tasks from roles/<role_name>/tasks/main.yaml. Here’s the overview of my site.yaml:
- name: Prepare all nodes & Download RKE2
  hosts: rke2 # servers + agents + longhorn nodes combined
  gather_facts: true
  roles:
    - download_rke2

# Bootstrap k8s
- name: Bootstrap RKE2 Servers
  hosts: servers
  gather_facts: true
  roles:
    - add_server

- name: Add additional RKE2 agents & longhorn agents
  hosts: agents, longhorn
  gather_facts: true
  roles:
    - add_agent

# Deploy applications
- name: Deploy applications
  hosts: servers
  gather_facts: true
  run_once: true
  roles:
    - role: apply_kube_vip
    - role: deploy_helm_apps  # Deploys all Helm apps from helm.yaml
Notice how much simpler this is compared to having separate roles for each application. Instead of calling apply-ssl, apply-longhorn, and apply-argocd individually, we now have a single deploy_helm_apps role that reads all application definitions from inventory/group_vars/all/helm.yaml and deploys them dynamically. This makes adding or removing applications as simple as editing a YAML configuration file.
Data-Driven Deployment: The helm.yaml Configuration#
This is where things get interesting. Instead of creating a separate role for each application (which led to a lot of code duplication), I’ve centralized all Helm application configurations into a single file: inventory/group_vars/all/helm.yaml. This file defines a helm_applications list, and each item describes one application to deploy.
Here’s what a typical application definition looks like:
helm_applications:
  # cert-manager: Certificate management for Kubernetes
  - name: cert-manager
    chart: cert-manager
    version: v1.17.2
    repo: https://charts.jetstack.io
    namespace: cert-manager
    create_namespace: true
    set_values:
      crds.enabled: "true"
      extraArgs[0]: "--dns01-recursive-nameservers-only"
      extraArgs[1]: "--dns01-recursive-nameservers=1.1.1.1:53"
    additional_manifests:
      - cert-manager-issuer

  # traefik: Ingress controller and load balancer
  - name: traefik
    chart: traefik
    repo: https://traefik.github.io/charts
    namespace: traefik
    create_namespace: true
    values_content: |
      service:
        type: LoadBalancer
        spec:
          loadBalancerIP: {{ vip_ingress_ip }}
      tlsStore:
        default:
          defaultCertificate:
            secretName: wildcard-tls
    additional_manifests:
      - traefik-wildcard-cert

  # longhorn: Distributed block storage
  - name: longhorn
    chart: longhorn
    version: v1.8.1
    repo: https://charts.longhorn.io
    namespace: longhorn-system
    create_namespace: true
    ingress:
      enabled: true
      host: "longhorn.{{ ssl_local_domain }}"
      service_name: longhorn-frontend
      service_port: 80
    additional_manifests:
      - longhorn-iscsi
      - longhorn-nfs
Each application entry supports:
- Basic Helm config:
name,chart,version,repo,namespace - Helm values: via
set_values(for simple key-value pairs) orvalues_content(for complex YAML blocks) - Ingress routing: If
ingress.enabledis true, anIngressRouteis automatically created - Additional manifests: Custom resources like the ClusterIssuer for cert-manager or dependency jobs for Longhorn
The beauty of this approach is that the deploy_helm_apps role simply loops through this list and applies templates. Here’s the simplified logic from roles/deploy_helm_apps/tasks/main.yaml:
- name: Deploy helm charts
  ansible.builtin.template:
    src: templates/helm-chart.yaml.j2
    dest: "/var/lib/rancher/rke2/server/manifests/{{ item.name }}-helm-chart.yaml"
  loop: "{{ helm_applications }}"

- name: Deploy ingress routes for apps with ingress enabled
  ansible.builtin.template:
    src: templates/ingress-route.yaml.j2
    dest: "/var/lib/rancher/rke2/server/manifests/{{ item.name }}-ingress-route.yaml"
  loop: "{{ helm_applications }}"
  when:
    - item.ingress is defined
    - item.ingress.enabled | default(false)

- name: Deploy additional manifests
  ansible.builtin.template:
    src: "templates/additional/{{ manifest }}.yaml.j2"
    dest: "/var/lib/rancher/rke2/server/manifests/{{ manifest }}.yaml"
  loop: "{{ all_additional_manifests }}"
This data-driven approach means:
- No code duplication: One set of templates handles all applications
- Easy to maintain: Adding a new app is just adding a YAML block
- Consistent structure: Every app follows the same deployment pattern
- Clear overview: All deployed apps are visible in one config file
Now let’s dive into how specific applications are deployed with this system.
The Playbook in Action: A Step-by-Step Breakdown#
1. Prepare All Nodes & Download RKE2#
This role prepares each node for RKE2 by configuring node-level prerequisites and placing the RKE2 binary on the system. It runs on all nodes (servers and agents) and performs the following tasks:
- Disable Swap: Ensures swap is disabled, a prerequisite for the Kubelet (source).
- Enable IP Forwarding: Enables IPv4 and IPv6 packet forwarding via
sysctl, a networking requirement for all CNI plugins (source). - Create Install Directory: Ensures the target directory for the binary (e.g.,
/usr/local/bin) exists. - Download RKE2 Binary: Downloads the specific RKE2 version defined in your variables.
- Set Permissions: Makes the downloaded RKE2 binary executable.
- Create Server-Specific Directories: On
serversonly, it pre-creates the directories for RKE2 manifests (/var/lib/rancher/rke2/server/manifestsforHelm Controllerdeployment) and configuration (/etc/rancher/rke2).
2. Bootstrapping the Control Plane (add-server)#
This role targets only the servers group to configure and start the RKE2 server components, forming the control plane. This role includes:
- Create Configuration Directory: Ensures
/etc/rancher/rke2/exists. - Deploy Server Configuration: Deploys a
config.yamlfile from a template. This file dynamically populates key settings:token: The shared secret for the cluster.tls-san: A list of Subject Alternative Names for the API server’s TLS certificate, including the node’s IP, hostname, and the shared Virtual IP (vip).- Conditional Logic: The role intelligently detects if it’s configuring the first server or a joining server. For joining servers, it adds the
serverURL to the config so the new node knows how to connect to the existing cluster.
- Enable and Start RKE2 Server: Enables and starts the
rke2-server.service. - Deploy CoreDNS Config (First Server Only): On the first server, it deploys a custom CoreDNS configuration. (Thanks to the
Helm Controller, this will be automatically applied to the cluster). - Create Kubeconfig: It waits for the server to be ready and then creates a
.kube/configfile in the remote user’s home directory.
The main logic is in roles/add-server/tasks/main.yaml, and the Jinja template that injects the variables is at roles/add-server/templates/rke2-server-config.j2. You can see I’ve disabled certain things (like rke2-ingress-nginx) to make it more lightweight and replace them with my own (Traefik).
write-kubeconfig-mode: "0644"
token: {{ rke2_token }}
# server: https://{{ hostvars[groups['servers'][0]]['ansible_host'] }}:9345 // for join node
tls-san:
  - {{ vip }}
{% for host in groups['servers'] %}
  - {{ hostvars[host]['ansible_host'] }}
{% endfor %}
node-label:
  - server=true
disable-cloud-controller: true
disable:
- rke2-ingress-nginx
kube-proxy-arg:
  - "proxy-mode=ipvs"
  - "ipvs-strict-arp=true"
kube-proxy-extra-mount:
- "/lib/modules:/lib/modules:ro"
3. Joining the Worker Nodes (add-agent)#
This role targets all hosts in the agents and longhorn groups, configuring them as worker nodes and joining them to the cluster.
- Create Configuration Directory: Ensures
/etc/rancher/rke2/exists. - Create Systemd Service: Generates the
rke2-agent.servicesystemd file from a template. - Deploy Agent Configuration: Deploys a
config.yamlfile templated with the server URL (pointing to the first master) and the cluster token. It also includes specific settings for thelonghorngroup so that when we deploy Longhorn later, it knows which nodes it should run on. - Enable and Start RKE2 Agent: Enables and starts the
rke2-agent.service, which connects to the control plane.
Here’s the agent config template. Notice in the node-label section, you can add a label for Longhorn nodes, this will be useful later when we deploy Longhorn.
write-kubeconfig-mode: "0644"
token: {{ rke2_token }}
server: https://{{ hostvars[groups['servers'][0]]['ansible_host'] }}:9345
node-label:
  - "agent=true"
#  - "node.longhorn.io/create-default-disk=true"
kube-proxy-arg:
  - "proxy-mode=ipvs"
  - "ipvs-strict-arp=true"
kube-proxy-extra-mount:
- "/lib/modules:/lib/modules:ro"
4. High Availability with Kube-VIP#

This role sets up a virtual IP (VIP) to create a highly available endpoint for the Kubernetes API server. kube-vip provides VIP and load balancing for bare-metal clusters. For control plane HA, it ensures continuous access to the API Server if a node fails. Additionally, it provides a native, in-cluster load balancer solution, giving us Service objects of type LoadBalancer without needing an external cloud provider.
This playbook performs the following tasks:
Deploy RBAC Rules: Deploys a template to create the necessary
ClusterRoleandClusterRoleBindingfor Kube VIP.Deploy Kube VIP ConfigMap: Deploys a
ConfigMapthat configures the virtual IP address.Deploy Kube VIP Cloud Controller: Deploys a template that creates a
DaemonSet(to run Kube VIP on every control-plane node) and the cloud controller (to provideLoadBalancerservices).
Remember when I mentioned the Helm Controller that RKE2 integrated? This makes deploying manifests easy. Any file found in /var/lib/rancher/rke2/server/manifests will automatically be deployed, similar to kubectl apply. However, this method isn’t always reliable, as it’s hard to debug and track what went wrong (as you’ll see in the next section). Therefore, I’ve chosen ArgoCD to deploy all my applications later.
5. Ingress and SSL with Traefik & Cert-Manager#

I didn’t want to access services via NodePort and port-forwarding. I figured I’d configure LoadBalancer services, since I already have kube-vip. However, I also don’t like remembering IPs for each service, so I thought I’d use an Ingress Controller.
I need to be honest: this part was a nightmare, and I want to share the solutions so you don’t waste a day like I did.
Problem 1 (Silent Fail): RKE2’s Helm controller silently failed because I forgot to rename my
cert-manager-helm-chart.j2file to.yaml.Problem 2 (Fetch Fail): When it finally loaded, the HelmChart couldn’t fetch the cert-manager repo. The logs were useless.
Solution 2: I had to download the
.tgzfile, base64 encode it, and manually inject it into thechartContentfield of the manifest just to see the real error.Problem 3 (DNS Fail): The real error was that DNS-01 validation was failing. My VM’s default DNS (
/etc/resolv.conf) was pointing to my internal router, which couldn’t resolve the Let’s Encrypt validation domains.The Fix: I had to go all the way back to Terraform and specify an external DNS server (like
1.1.1.1) in mycloud-initconfig. I’m still not 100% sure why this was the only fix, but it worked.
Eventually, I circled back to Traefik - mainly because I’m planning to integrate Authentik for authentication, and Traefik’s middlewares make that much easier.
With the new deploy_helm_apps approach, both Cert-Manager and Traefik are defined in helm.yaml. Here’s how they’re configured:
Cert-Manager configuration:
- name: cert-manager
  chart: cert-manager
  version: v1.17.2
  repo: https://charts.jetstack.io
  namespace: cert-manager
  create_namespace: true
  set_values:
    crds.enabled: "true"
    extraArgs[0]: "--dns01-recursive-nameservers-only"
    extraArgs[1]: "--dns01-recursive-nameservers=1.1.1.1:53"
  additional_manifests:
    - cert-manager-issuer  # Deploys the ClusterIssuer
Notice the extraArgs for DNS configuration - this is the fix for Problem 3 above. The additional_manifests field tells the role to also deploy the ClusterIssuer, which authenticates with Cloudflare:
---
apiVersion: v1
kind: Secret
metadata:
  name: cloudflare-api-token-secret
  namespace: cert-manager
type: Opaque
stringData:
  api-token: {{ ssl_cloudflare_api_token }}
---
apiVersion: cert-manager.io/v1
kind: ClusterIssuer
metadata:
  name: cloudflare-clusterissuer
spec:
  acme:
    email: {{ ssl_email }}
    server: https://acme-v02.api.letsencrypt.org./directory
    privateKeySecretRef:
      name: cloudflare-key
    solvers:
    - dns01:
        cloudflare:
          apiTokenSecretRef:
            name: cloudflare-api-token-secret
            key: api-token
After that, you need to configure Traefik to use this issuer to generate wildcard certificates. This means any service I create at *.dev.phuchoang.sbs will get SSL automatically. Here’s the Traefik configuration from helm.yaml:
Traefik configuration:
- name: traefik
  chart: traefik
  repo: https://traefik.github.io/charts
  namespace: traefik
  create_namespace: true
  values_content: |
    service:
      type: LoadBalancer
      spec:
        loadBalancerIP: {{ vip_ingress_ip }}
    tlsStore:
      default:
        defaultCertificate:
          secretName: wildcard-tls
    ingressRoute:
      dashboard:
        enabled: true
        matchRule: Host(`traefik.{{ ssl_local_domain }}`)
        entryPoints: ["websecure"]
    ports:
      web:
        redirections:
          entryPoint:
            to: websecure
            scheme: https
            permanent: true
  additional_manifests:
    - traefik-wildcard-cert  # Deploys the Certificate resource
The traefik-wildcard-cert manifest creates a Certificate that requests a wildcard cert from our ClusterIssuer:
apiVersion: cert-manager.io/v1
kind: Certificate
metadata:
  name: wildcard-cert
  namespace: traefik
spec:
  secretName: wildcard-tls
  dnsNames:
    - "{{ ssl_local_domain }}"
    - "*.{{ ssl_local_domain }}"
  issuerRef:
    name: cloudflare-clusterissuer
    kind: ClusterIssuer
  privateKey:
    rotationPolicy: Always
  additionalOutputFormats:
    - type: CombinedPEM
6. Deploying Core Services (Longhorn & ArgoCD)#
Longhorn: For Persistent, Replicated Storage#

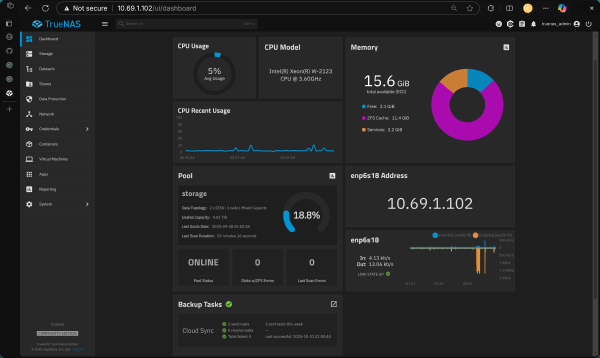
Longhorn is a lightweight, distributed block storage system for Kubernetes. It provides persistent storage for stateful applications, replicates that storage for high availability, and can back up volumes to our TrueNAS NFS server.
We install Longhorn on the nodes we tagged with the node.longhorn.io/create-default-disk=true label back in the add-agent role. However, Longhorn has several prerequisites, including open-iscsi and an nfsv4 client. When I used the Longhorn CLI tool to check my nodes, I found I was missing them.
Luckily, Longhorn offers manifest jobs to install these dependencies. With the new helm.yaml approach, we simply reference these in the additional_manifests field:
Longhorn configuration:
- name: longhorn
  chart: longhorn
  version: v1.8.1
  repo: https://charts.longhorn.io
  namespace: longhorn-system
  create_namespace: true
  set_values:
    defaultSettings.createDefaultDiskLabeledNodes: "true"
    persistence.reclaimPolicy: "Retain"
  ingress:
    enabled: true
    host: "longhorn.{{ ssl_local_domain }}"
    service_name: longhorn-frontend
    service_port: 80
  additional_manifests:
    - longhorn-iscsi  # Installs iSCSI dependencies
    - longhorn-nfs    # Installs NFS client dependencies
Notice three things here:
- The
additional_manifestsfield automatically deploys the prerequisite jobs - The
ingress.enabledflag tellsdeploy_helm_appsto create an IngressRoute - The
set_valuesconfigures Longhorn to use our labeled nodes
All of this happens automatically - the role loops through the configuration, deploys the manifests, creates the Helm chart, and sets up the ingress.
ArgoCD: Our GitOps Engine#

ArgoCD will play a prominent role in the cluster, as it will be responsible for deploying all of our applications in the next part of the series. With the centralized configuration, deploying ArgoCD is just another entry in helm.yaml:
ArgoCD configuration:
- name: argo-cd
  chart: argo-cd
  version: v8.0.9
  repo: https://argoproj.github.io/argo-helm
  namespace: argo-cd
  create_namespace: true
  values_content: |
    configs:
      params:
        server.insecure: true  # We handle TLS at Traefik
  ingress:
    enabled: true
    host: "argo.{{ ssl_local_domain }}"
    service_name: argo-cd-argocd-server
    service_port: 80
The server.insecure: true setting is intentional - we’re terminating TLS at Traefik (our ingress controller), not at ArgoCD itself. This is a common pattern in Kubernetes where the ingress handles all TLS, and internal traffic is plain HTTP.
The power of this approach: If I want to add another application tomorrow (say, Prometheus or Grafana), I just add another block to helm.yaml. No new role, no new template files scattered around - just one YAML entry, and deploy_helm_apps handles the rest.
The Final Handoff: Getting kubectl Access#
After all those tasks, we finally have a fully-fledged, working Kubernetes cluster. The last step is to get cluster access so we can control it with kubectl.
Note: This section will be updated in a future post to cover OIDC authentication with HashiCorp Vault. Instead of fetching and storing kubeconfig files directly, we’ll integrate the cluster with Vault for centralized identity management and short-lived credentials. This provides better security through:
- Zero-trust authentication via OIDC
- Role-based access control (RBAC) tied to Vault policies
- No long-lived credentials stored locally
For now, you can fetch the kubeconfig from the first server node to get cluster access, but we’ll replace this with the Vault OIDC flow in the upcoming GitOps series.
Verification#
Once you have cluster access configured, you can verify the deployment. Here’s an example of checking the nodes:
dev (default) in kubernetes-proxmox on  master [!] is 📦 v0.1.0 via 🐍 v3.13.7
❯ k get nodes
NAME            STATUS   ROLES                       AGE    VERSION
dev-longhorn1   Ready    <none>                      2d3h   v1.32.3+rke2r1
dev-longhorn2   Ready    <none>                      2d3h   v1.32.3+rke2r1
dev-longhorn3   Ready    <none>                      2d3h   v1.32.3+rke2r1
dev-server1     Ready    control-plane,etcd,master   2d3h   v1.32.3+rke2r1
dev-server2     Ready    control-plane,etcd,master   2d3h   v1.32.3+rke2r1
dev-server3     Ready    control-plane,etcd,master   2d3h   v1.32.3+rke2r1
You can also verify that all the Helm applications deployed successfully:
❯ kubectl get helmcharts -A
NAMESPACE     NAME              CHART          REPO                                      VERSION    STATUS
cert-manager  cert-manager      cert-manager   https://charts.jetstack.io                v1.17.2    Deployed
traefik       traefik          traefik        https://traefik.github.io/charts          latest     Deployed
longhorn-sy.. longhorn         longhorn       https://charts.longhorn.io                v1.8.1     Deployed
argo-cd       argo-cd          argo-cd        https://argoproj.github.io/argo-helm      v8.0.9     Deployed
After that, use kubectx and kubens (highly recommended tools) to switch your context and namespace. Then, verify the nodes.
dev (default) in kubernetes-proxmox on master [!] is 📦 v0.1.0 via 🐍 v3.13.7
❯ k get nodes
NAME STATUS ROLES AGE VERSION
dev-longhorn1 Ready <none> 2d3h v1.32.3+rke2r1
dev-longhorn2 Ready <none> 2d3h v1.32.3+rke2r1
dev-longhorn3 Ready <none> 2d3h v1.32.3+rke2r1
dev-server1 Ready control-plane,etcd,master 2d3h v1.32.3+rke2r1
dev-server2 Ready control-plane,etcd,master 2d3h v1.32.3+rke2r1
dev-server3 Ready control-plane,etcd,master 2d3h v1.32.3+rke2r1
Summary & Next Steps#

And just like that, we have a fully-fledged, highly-available Kubernetes cluster.
Thanks to Terraform, we can destroy and rebuild these 12 VMs in minutes. And thanks to Ansible, we can configure them all from scratch with a single command (ansible-playbook site.yaml).
We now have:
- A multi-master
RKE2control plane - A Virtual IP for HA with
kube-vip - An ingress controller (
Traefik) - Automatic SSL certificates (
cert-manager) - Distributed persistent storage (
Longhorn)
The cluster is built. The platform is ready. In the next and final part of this series, we’ll do the fun stuff: use ArgoCD to deploy all of our applications with a true GitOps workflow.