In the previous parts of this series, we went from a single hand-me-down PC to a full 3-node cluster, and then we installed Proxmox as our hypervisor. We even managed to pass through a GPU to a VM for near-native performance.
This time, we’re diving into one of the most critical parts of any homelab: storage.
In fact, many people (myself included) start this homelab journey just because we need a platform to store data other than Google Drive as we creep toward that 15GB limit. Now, imagine having your own private Google Drive at home, but with 10s of terabytes.
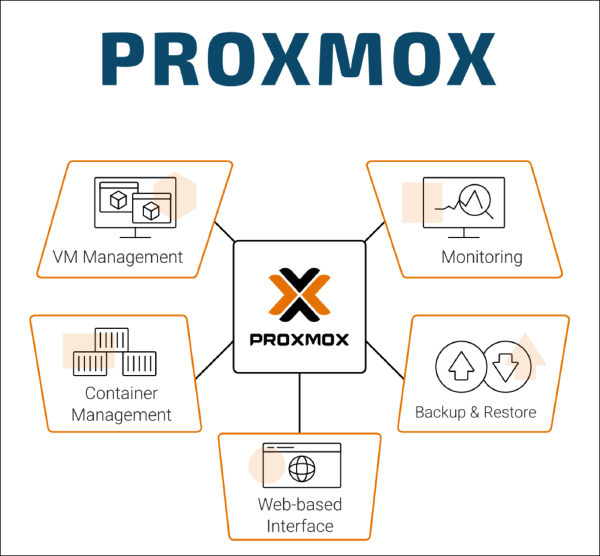
We will be virtualizing TrueNAS, a world-class, open-source NAS (Network Attached Storage) platform, right inside Proxmox. We’ll pass through our physical hard drives, set up a ZFS storage pool, and create network shares (like NFS and SMB) that our entire homelab will use.

So, what is a NAS#
But first, to understand what a NAS is, you have to consider the core problem it solves.
Imagine you’re a video editor, working on your local machine with 10GB of footage. It’s going smoothly… as long as you’re working alone.
But what happens when the workload is heavy and you need to collaborate with other editors? Are you going to wait for someone to finish, copy all 10GB of files onto a USB drive, and walk it over to them? This could take an hour. Then you do your small part, and you have to transfer it back for another hour. This painful, time-wasting process is a complete nightmare. Not to mention, if someone’s computer has problems and their files are gone, how can you restore them?

This is where a NAS comes to the rescue. A NAS device is essentially a smart server full of hard drives that plugs directly into your network. Instead of everyone having their own 10GB copy, the single, master copy of the project lives on the NAS. Now, everyone on the team can connect to the NAS over the fast local network at the same time. It appears on their computer just like another hard drive.
- You, the other editor, and the animator can all read and write to the same central files simultaneously.
- There’s no more copying, no more hour-long USB transfers, and no more confusion about “Which file is the latest version?”
- No more worrying about lost files if your computer has problems, as long as the central
NASis still active.
Now, in our homelab context, replace “editors” with “VMs” or “PCs”. The number isn’t three, but maybe 10 or 100. You will save a bunch of time by having a NAS so your VMs can access data efficiently, without relying on their own local storage in case one of them fails.
Which NAS platform to choose#
I used to be a Synology user, running Xpenology to get the DSM (Disk Station Manager) platform on my non-Synology hardware. After using it for a while, although the software support is top-notch and very user-friendly, I migrated to TrueNAS because I wanted deeper control and customization. The OS TrueNAS provides also feels lighter to me and seems to be more focused and specialized as a storage platform. Synology, on the other hand, seems more like an All-in-One platform, encompassing a hypervisor and integrated apps, which feels a bit bloated for my needs.
One more thing: TrueNAS officially supports ZFS and Synology officially supports BTRFS as a file system. From what I understand, BTRFS is for flexibility and less demanding roles, while ZFS is for maximum reliability and data integrity, especially in servers. I have to admit that I don’t use all the advanced features of either, but with the correct configuration (log, cache, etc.), ZFS can outperform BTRFS in both speed and scale.
Virtualize NAS … why not?#
Preface: For best practices, and if you have the money, get yourself a dedicated NAS device like a Synology.
In theory, dedicating a machine to be a NAS means I shouldn’t run other compute resources on it, as it breaks the “specialized tool” idea I mentioned before. You should have a separate Synology or custom NAS build, separate from your compute resources like Proxmox.
At first, I thought about using one of the other machines (HP Prodesk or Dell Optiplex) as the main NAS device, without Proxmox installed. But a NAS requires lots of HDD slots; otherwise, what’s the point? I quickly realized those SFF computers only have one or two HDD slots. The only computer I have that allows multiple slots is the Lenovo P520.
But the Lenovo P520 is the strongest of all; sacrificing it only to store data would be so wasteful. Since I’m still a student, I don’t want to spend more money and wanted to consider an alternative.
Luckily, with Proxmox, I can virtualize the NAS platform in a VM and pass through the HDDs directly to it. This isn’t “best practice” because it creates a single point of failure: if the Lenovo P520 is in maintenance mode, everything else loses access to storage. I only chose this because it allows me to use the PC’s multiple HDD slots while still running other compute resources, all without breaking my bank. With proper HDD passthrough, we give the TrueNAS VM direct, bare-metal control of the drives. The performance is basically native, and it’s been rock-solid for me.
This is almost the same process we used for the GPU. We need to tell Proxmox, “Don’t touch these drives; give them directly to this VM.

First, we need the unique IDs for our drives. Don’t use /dev/sda or /dev/sdb, as those can change on reboot. We need the permanent “by-id” path. Hop on to the pve/Disks tab to see the information and take note of the disk serial numbers you want to pass through. Then, in the shell, run:
ls -l /dev/disk/by-id/
Look for the ata- names that match the serial numbers of your whole disks (e.g., ata-WDCWD10EZEX-00WN4A0...). You want the main disk ID, not the ...-part1 or ...-part2 names.
Once you have your disk IDs, make sure your TrueNAS VM is shut down. Then, run this command for each disk:
# qm set <VMID> --<controller> <controllernumber> /dev/disk/by-id/<your-disk-id>

# Example for the first disk:
qm set 100 --scsi1 /dev/disk/by-id/ata-WDCWD10EZEX-00WN4A0WD-WCC6Y...

# Example for the second disk:
qm set 100 --scsi2 /dev/disk/by-id/ata-WDCWD10EZEX-00WN4A0WD-WCC6Z...
Repeat this for all your drives, incrementing the scsi number. Now, when you boot your TrueNAS VM, it will see these disks as if they were physically attached. I decided to reserve only my 4TB + 1TB HDD drives for TrueNAS; the remaining HDD is used for the Proxmox OS itself.
RAID Theory (but I use Stripe, btw)#
Preface: Again, for best practice, don’t be like me.
After you’ve passed through the drives and booted TrueNAS, you’ll go to Storage > Pools > Create Pool. This is where you make the most important decision: how to combine your drives.

RAID (Redundant Array of Independent Disks) combines multiple drives into one logical unit. ZFS uses its own software-based RAID, with a few main types:
Stripe (RAID 0): This is for max speed and max risk. It “stripes” data across all drives.
Pros: Super-fast reads/writes. You get 100% of the storage (e.g., 4TB + 1TB = 5TB).
Cons: If one drive fails, all data on all drives is gone. Zero redundancy.
Mirror (RAID 1): This is for max safety. It’s a 1-to-1 clone (e.g., two 4TB drives mirrored = 4TB usable).
Pros: If one drive fails, your data is 100% safe on the other.
Cons: You only get 50% of your total storage.
RAIDZ1 (RAID 5): The classic balance. It stripes data and writes a “parity” block, which can be used to rebuild a lost drive.
Pros: Good performance and safety. You can lose one drive.
Cons: You lose the capacity of one drive to parity (e.g., three 4TB drives = 8TB usable).
RAIDZ2 (RAID 6): Same as above, but with two parity blocks. You can lose two drives.
So you might guess I should be choosing Mirror or RAIDZ1, right? Well, I chose Stripe.
I know what you’re thinking: “That’s insane! You have no redundancy!” And you’re right. I’m fearless, and I honestly don’t care about a hardware failure.
My philosophy is that my data is the most important thing, not the hardware. I already have a 5TB Microsoft 365 (OneDrive) plan that backs up 100% of my critical data. If a drive in my Stripe pool fails, who cares? The data itself is safe in the cloud. I’ll just buy a new drive, create a new pool, and restore from my backup.
This is my personal trade-off. I lose time (it will be a pain to wait for restoration). But I gain money and speed, as I don’t have to buy extra HDDs just for parity, and I get 100% of my storage capacity and maximum performance. But seriously, do not do this in production.

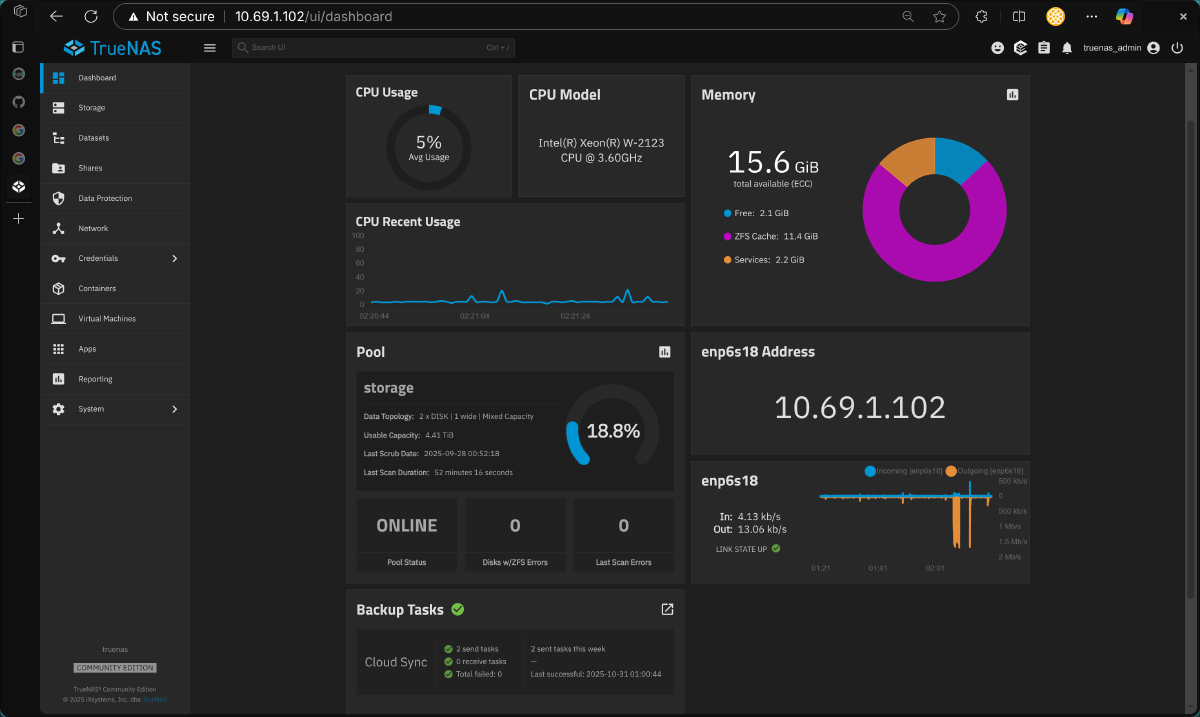
So, I went ahead and created a Stripe pool that combines my 4TB and 1TB drives. Additionally, I also created a 128GB SLOG by passing through an NVMe drive (a similar process to the GPU, as it’s a PCI device). Since I’m going to use this NAS as file storage for other VMs and containers, I need a SLOG to improve performance for synchronous writes by storing them in a fast log before they’re written to the slower pool drives. You don’t need this if you only use your NAS for storing media.
Next, after creating a pool (in my case, storage), we need to create datasets for better isolation. For example, I’ll use TrueNAS for:
appdata: storing application data for containersiso: storing PS4, Switch, and Windows gamesmedia: storing media files for Jellyfin, manga for Suwayomi, etc.proxmox: storing backups, ISO images, and CT templates for Proxmoxminio: storing S3 object storage
Therefore, I’ll create these 5 different datasets in my pool.

File sharing#
Now that we have our pool and datasets, the next step is to share them over the network. There are three file-sharing protocols I currently use: SMB, NFS, and FTP.
NFS for appdata#
As I mentioned in the previous part, I primarily use TrueNAS to store persistent data for my stateful applications (containers). This way, even if I delete and recreate a container, it still functions the same as before.
NFS is the native file-sharing protocol for Linux/Unix environments. Since all my containers and Proxmox are Linux-based, it’s the best tool for the job.
First, set up NFS on TrueNAS via the Shares tab. The main thing is to enable NFSv4 support. Next, for the appdata dataset share, go to Advanced Options and change the Mapall User and Mapall Group to root.

This maps any request from a non-root user (e.g., user 1000 inside a container) to the root user on TrueNAS. This ensures that when a container tries to write data, TrueNAS grants it the required permissions. Don’t do this in production, but in a homelab, you can mitigate the risk by limiting the client IPs that can connect (in the Hosts section).
After configuring TrueNAS, we SSH into our Docker VM to mount this NFS storage on boot.
# Install package for nfs client
sudo apt update && sudo apt install nfs-common

# Create a mount point in local directory
sudo mkdir -p /mnt/storage/appdata

# Open the configuration file for drive mount
sudo vim /etc/fstab
Go to the bottom of the file and add a new line, like this example:
10.69.1.102:/mnt/storage/appdata /mnt/storage/appdata nfs defaults,_netdev,nofail 0 0
Notice these three flags after the nfs block:
defaults: Uses standard options (likerwfor read-write andautoto mount at boot)._netdev: This tells your system “this is a network device, wait for the network to be online before trying to mount it.” This prevents your system from hanging at boot.nofail: This tells your system “if you can’t mount this for any reason (e.g., theNFSserver is offline), don’t hang the boot process. Just skip it and continue.”
After that, run these commands to reload the config and mount the share:
sudo systemctl daemon-reload
sudo systemctl restart remote-fs.target
After verifying the mount, we tell Docker to use it as a local volume by creating an APPDATA environment variable and referencing it in our docker-compose.yml files.

NFS for proxmox#
I use this exact same NFS protocol for the proxmox dataset, which I add as a storage target in the Proxmox datacenter. This is especially useful for a Proxmox cluster: once you set it up on one node, the storage is shared with all nodes. This allows for instant live migration of VMs, as you’re only moving the RAM, not the disk.

Here’s the example demo of live migration VMs on Proxmox using shared storage from TrueNAS.
Smb for laptop, phone clients#
If you don’t want to install an app like Jellyfin, you can still watch your movies by using SMB to mount the media dataset directly in your laptop’s file browser. You can open, edit, and delete files as if it were a local folder. This is the same protocol the video editors in my earlier example would use.
Below is a showcase where I can watch a movie on both my laptop and phone by just opening the file, no download needed.


FTP for edge devices like PS4 and Nintendo Switch#
For devices that don’t support NFS or SMB (like my hacked PS4 and Nintendo Switch), no problem. TrueNAS also offers the FTP protocol. I use it to install games on my console. I can easily download a game via qbittorrent (running on the NAS) and then connect the device to my FTP server to transfer the file.

Additional quality-of-life applications#
Remember when I said it’s “best practice” to separate compute from storage? Well, your life will be much easier if you install a few lightweight, storage-related applications on your NAS.
Download clients#
Firstly, aria2 is a lightweight, multi-protocol, cross-platform download utility that operates on the command line. When bundled with a web UI like aria2-ng, it makes downloading to your NAS so much easier. There are browser extensions that can even capture download links and send them directly to your aria2 instance, automating file downloads right onto your NAS.

Secondly, if you’ve been “sailing the seas” for a long time, you’ve definitely heard of uTorrent, which is a client to download… “Linux ISOs”… from a decentralized peer-to-peer network. However, uTorrent only provides a desktop application and is full of ads, so the community has switched to qbittorrent. It has a great web interface and supports being deployed as a Docker image, so I’ve been using it to download my “Linux ISOs” for a long time now.

S3-compatible storage#
I’ve just started playing around with this recently, but I can already see its tremendous potential. If you don’t know, S3 is a cloud storage service from AWS that allows you to store data as objects (a file plus metadata) organized into “buckets.” It’s used for a wide range of applications, including backups, data lakes, and hosting static websites.
With the recent AWS outage, for anyone wanting to migrate to an alternative, self-hosted object storage platform, I recommend Minio. It’s open-source and fully S3-compatible. I’m definitely going to use this for my Terraform remote state, which I’ll introduce in the next part.

And that’s all the applications I’ve installed on my TrueNAS server. As you can see, there aren’t many, and they consume very little RAM, but they bring so much quality-of-life value.
Just so you know, if you want to deploy any app, TrueNAS also has a dedicated interface in the “Apps” tab. You’ll likely just need to configure a dataset as an “app” type and set the user/group for the application to 568, which is the default ID for the built-in “apps” user (yours might look different).

Backup#
This is critical. Who knows when your homelab will suddenly die? (wink, wink).
This section even deserves its own article. I’ve switched between many backup solutions in the past: from only using Proxmox and rclone-to-OneDrive, to using Restic inside a Docker VM, and finally to using the integrated TrueNAS data protection features. I’m quite satisfied with the current setup, as it offers minimal restore time, minimal storage overhead, and easy progress tracking to see if anything went wrong.
Here’s my strategy:
1. Proxmox Backups First, for Proxmox, I enabled the integrated backup feature. I have it scheduled to store backups of all my VMs and LXCs directly to the proxmox dataset (via NFS) on the TrueNAS server we just set up.

2. Application Data Backups Secondly, for my application data, I don’t need a separate tool like Restic. Since I designed all my containers to store their persistent data directly on the appdata NFS share, the data is already centralized on the NAS. Backing up the NAS is backing up the apps.

3. Local Snapshots (The First Copy) Thirdly, now that I have all my centralized data (Proxmox backups and appdata) on TrueNAS, I enable snapshots. According to the 3-2-1 backup rule, you need at least 3 copies of your data. TrueNAS helps with this: it has the ability to configure automatic snapshots every night and allows you to restore even a single file or subfolder from those snapshots easily.

4. Off-site Backup (The “3-2-1” Completion) Finally, the 3-2-1 rule states you need 3 copies, on 2 different media types, with 1 copy off-site.
Again, I don’t have the budget for a second on-site backup machine, so I’m relying on my 1 off-site copy. I’ve had a 5TB OneDrive plan (for free!) for a long time, so I’ve been using it as my primary off-site backup, and I still haven’t had any issues with it, so yeah.
TrueNAS has also made configuring rclone to connect with OneDrive much easier through its web interface. No need to remember all the quirky command-line flags anymore; you just need to toggle settings and click a few buttons to have it all configured. You can also view logs if a task fails and get notified via email immediately.

Summary#
And that’s it! We now have a rock-solid, (mostly) independent, and high-performance NAS running as a VM inside Proxmox.
We passed through our HDDs for bare-metal performance, explored the trade-offs of RAID (and my own “fearless” Stripe setup), and created SMB and NFS shares for every device in our lab.
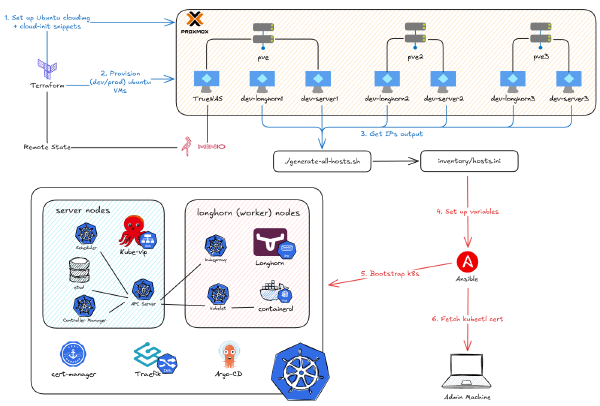
This NFS share is the final, critical piece of our infrastructure. We have prepared for next part where we create our Kubernetes cluster. With this design, we won’t store any persistent data inside the cluster’s VMs. We’ll tell them to store everything on our new TrueNAS server. If a Kubernetes VM dies, it’s no big deal - we just spin up another, connect it to the NFS share, and all our application data is still right where we left it.