A long time ago, my house only had 1 router, located on the third floor. So whenever we needed to access the internet while having dinner on the first floor, we needed to enable 4G or walk near the stairs just to receive a fraction of the WiFi signal. My father decided to give me an important task, which was to figure out how to solve this issue. I initially bought a simple WiFi extender located on the second floor, but after using it for a month, even though we could receive a strong signal from it, we couldn’t access the internet because the signal from the router on the 3rd floor to the WiFi extender on the 2nd floor was still really weak.
That’s when I decided to ask my dad to invest in a powerful second router located in my room on the 2nd floor, that could connect to the master router via LAN cable and advertise a strong WiFi signal. Researching multiple options, I opted for the Xiaomi CR6608 as it had impressive specs (WiFi 6, 4 antennas, gigabit) and most importantly, it could install OpenWRT. This opened a whole new world for me, because after 3 years, it has taught me many things about networking and the internet, such as subnets, IPv4, DHCP, DNS, and VPNs.

This post is a tour of my home network, built on that OpenWRT router. I’ll walk through how I designed my network layout, solved DNS and ad-blocking, and built a secure, globally-accessible lab using Tailscale and a cheap VPS.
Planning the Network#
Currently, this router is configured as a cascaded router behind another router (double NAT). So it is also a DHCP server, which subnet is 10.69.0.0/16, to give IPs to the client devices. It has the total capacity of giving 256*256=65536 IPs:
- Physical devices (fixed): 10.69.0.1 to 10.69.0.255 (255 ips)
- Proxmox VMs: 10.69.1.1 to 10.69.1.255 (255 ips)
- Kubernetes load balancers: 10.69.2.1 to 10.69.2.255 (255 ips)
- Other WLAN client (dynamic): 10.69.254.1 to 10.69.255.255 (510 ips)

I also plan to learn how to set up VLANs for additional security and a separate environment, but that requires a managed switch, which is kinda expensive. For now, it has done an awesome job of being a router, giving IPs and helping the clients connect to the internet. But it also needs to provide DNS for the client devices too.
Blocking Ads and Local DNS#
On the DNS side, I initially used an AdGuard local server hosted directly on the Xiaomi CR6608 to provide DNS for clients. But after running it for a while for my family, I found out that my device couldn’t hold up long when multiple devices trying to connect; it kept restarting after experiencing too much load. And also, when I wanted to go out, if I wanted to get the same DNS setup as when I was at home, I needed to configure a lot more to get it working.
So in the end, I chose to use NextDNS as my primary DNS solution. With luci-app-nextdns in the OpenWRT packages, my router gets the profile ID for my NextDNS profile and then advertises it so that every client can also have it. What’s more, I can still configure my iPhone to have an HTTPS DNS Profile for NextDNS when I go outside.

Additionally, it also has the capacity to block ads, parental controls, and blacklist or whitelist any domain you want. This feature is extremely useful if you want to limit yourself from doom-scrolling Facebook, YouTube, or any other services while you’re at work, and you can get access back when you’re not. It can also provide analytics and logs, which give you more monitoring options.


Accessing My Network from Anywhere#
But using DNS for my local server would not give me immediate access to my server at home. I needed a way to access my local IP while I am outside. Moreover, since my internet modem is also behind a NAT, opening port forwarding would have no effect. After researching, I found these were the options that could help me:
| Feature | WireGuard | Cloudflare Tunnel | Tailscale |
|---|---|---|---|
| How it Works | Direct Client-to-Server VPN. Your server at home listens for connections. | An agent at home sends an outbound connection to Cloudflare. | All devices connect to a virtual mesh network, brokered by Tailscale. |
| Setup Difficulty | Difficult | Medium | Very Easy |
| Needs Open Ports? | Yes | No | No |
| Client App Required? | Yes (on client devices) | No (for web access) | Yes (on all devices) |
| Key Pros | High performance, self-hosted, full network control. | Simple for web access, no client app for browsers, hides your home IP. | “It just works” simplicity, great for CG-NAT, powerful features (subnet routes). |
| Key Cons | Hard to set up, requires port forwarding, fails with CG-NAT. | Requires a domain, traffic limits (not for video), less flexible for non-web. | Requires their app on all devices, relies on a 3rd-party service. |
Needless to say, I have chosen Tailscale to work with. I couldn’t believe it is a free solution because it gives me so much management and many features. The ability to act as both a subnet route (advertise local IP for devices that don’t have the app) and an exit node (forward all the traffic through one device) is just super powerful. I did try using Cloudflare Tunnel at the beginning, but it required me to configure every DNS record each time I wanted to access a service, and it also did not allow me to stream video, so I migrated all of it to Tailscale a year ago.

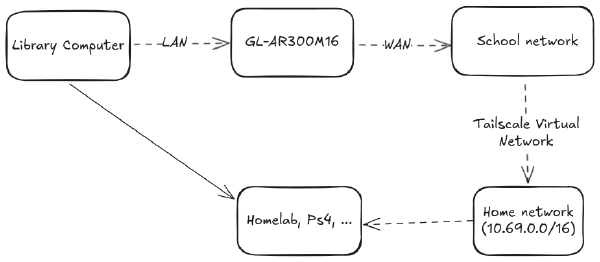
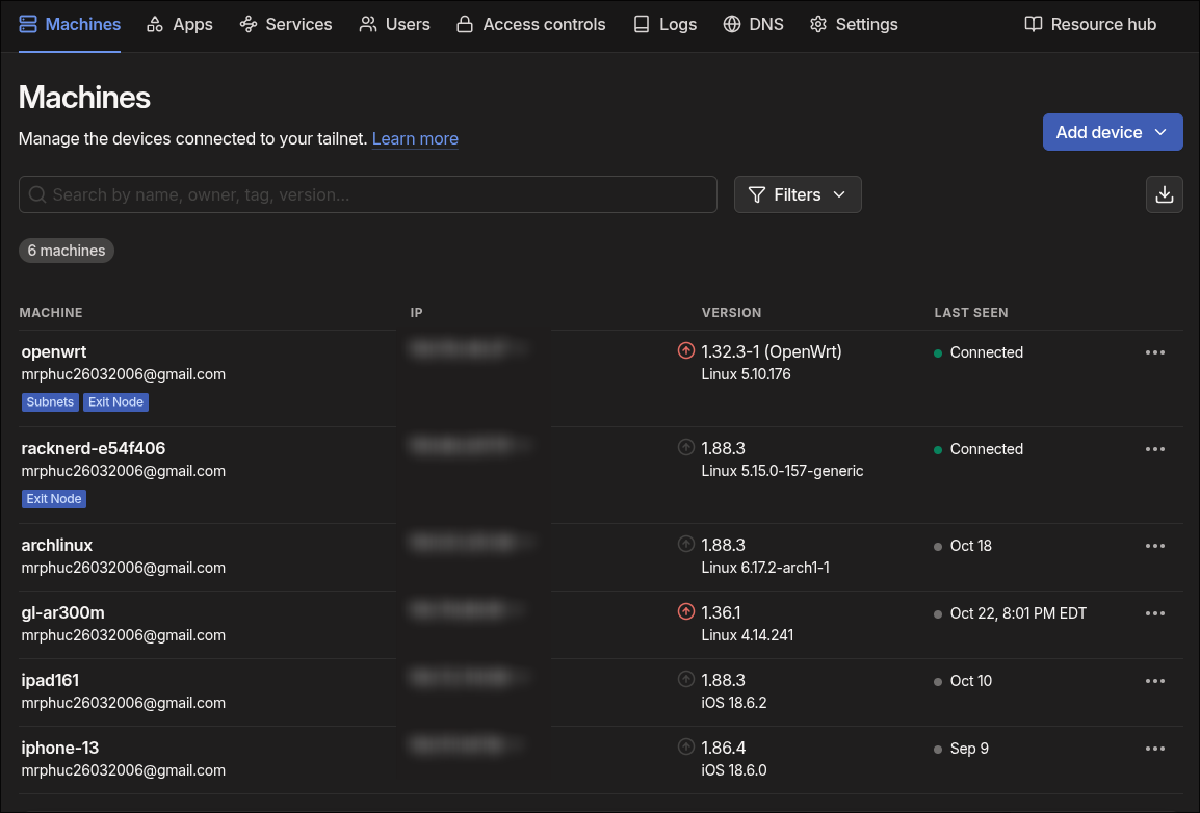
Currently, I have Tailscale installed on my OpenWRT router, which advertises a subnet route of 10.69.0.0/16 and also acts as an exit node. If I go outside, I just simply open the Tailscale app on my phone or my laptop, authenticate, and bang, connected. If I carry a device that can’t install Tailscale, I can simply connect it to my travel router (which is the gl-ar300m device in the image above), which I have wrote about here.
Don’t get me wrong, Cloudflare Tunnel is still a solid option. It has one feature that Tailscale couldn’t provide, which is the ability to allow guest users to connect to my home services without them needing to install an app or authenticate anything. This is extremely useful for a web blog when I want to showcase something. But for now, I have figured out a way to combine Tailscale and an additional VPS (a virtual private server, which is the racknerd-e54f406 device in the image above) to achieve this.
Securely Exposing Services to the Public#
One day, I was tinkering with the idea of finding the best VPS provider to host some of my services in case my homelab was on maintenance but I still wanted to access critical services such as Bitwarden (a password manager) and Actual-budget (a budgeting service). Then I found this site called RackNerd. They offered an option that shocked me with its price and specs:
- 11$ per year
- 1 vCPU Core
- 24 GB Pure SSD Storage
- 1 GB RAM
- 2 TB Monthly Transfer
- 1 Gbps Network Port
- Full Root Admin Access
- 1 Dedicated IPv4 Address
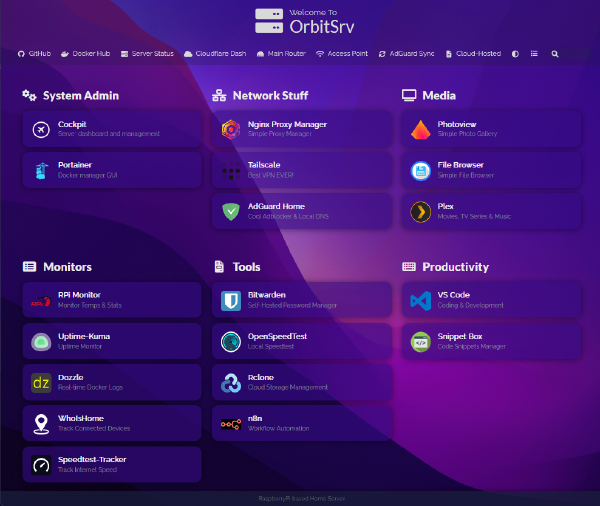
What’s more, I realized I could also connect to services at home using Tailscale + Nginx, which is a reverse proxy. With 1 GB RAM, I could easily install Nginx Proxy Manager in a Docker container. I also needed to configure DNS on Cloudflare to route all DNS requests beginning with *.vps.phuchoang.sbs and vps.phuchoang.sbs to match the public static IP of the VPS. The final step was to install Tailscale on it and then type the home IPs on the destination, and I was good to go.

However, I realized the above method was scary because it exposed the services publicly. If an application doesn’t have an authentication method or 2FA built-in, I was afraid hackers might attack my services at home. Therefore, I decided to spin up Authelia, an open-source authentication and authorization server. It allowed me to create a side-car authentication service for every “proxy host” in Nginx Proxy Manager above. All I needed to do was to add myself as a user and adjust the custom Nginx Configuration on the Advanced tab of each “proxy host”. Now each time you visit, for example nginx.vps.phuchoang.sbs, it will prompt you for a username and password. Even if you get it right, you have to provide the 2FA codes that are set up for each user. Pretty secure, right?

Summary#
It’s amazing to think this all started with a simple WiFi problem on the first floor. What began as a need for a second router (the Xiaomi CR6608) quickly became the “brain” of my entire home network.
By leveraging the power of OpenWRT, I built a custom network from the ground up. NextDNS handles clean and secure DNS (plus ad-blocking) for my whole family, both at home and on the go. Tailscale completely solves the challenge of being behind my ISP’s NAT, creating a secure mesh network that lets me access my 10.69.0.0/16 subnet from anywhere.
Finally, adding a cheap RackNerd VPS with Nginx Proxy Manager and Authelia gives me the best of both worlds: a way to securely expose public services (like a blog) or private services (like Actual-budget) to the internet, all while being protected by a strong 2FA authentication portal. This setup is the backbone of all my projects and has been a powerful, hands-on learning experience.