A week ago, my laptop died. When I booted it up, it said something like, fTPM is corrupted, press Y to reset or N to do nothing. Neither of them helped me boot into my machine. So I had a severe mental attack back then, because that machine was the primary one that helped me do my work for school, my lab, and my personal projects. I was lucky to have my friend lend me an old laptop of his, but it was pretty bulky, so I figured I couldn’t bring it to school. Therefore, I had to go to the school library to do my work on its public computers.
Luckily, I have a Microsoft Edge sync account, so all of my tabs, history, extensions, and passwords were replicated exactly like my old setup. However, as it is a school computer, it’s managed by the organization, so I couldn’t install any programs, [[replicate an exact programming experience on any machine]], or browse my personal home network. Lucky me again, there was a VirtualBox program on the school computer, so I could install Arch on it and run the script to download and configure all of my dotfiles and programs that I frequently use.
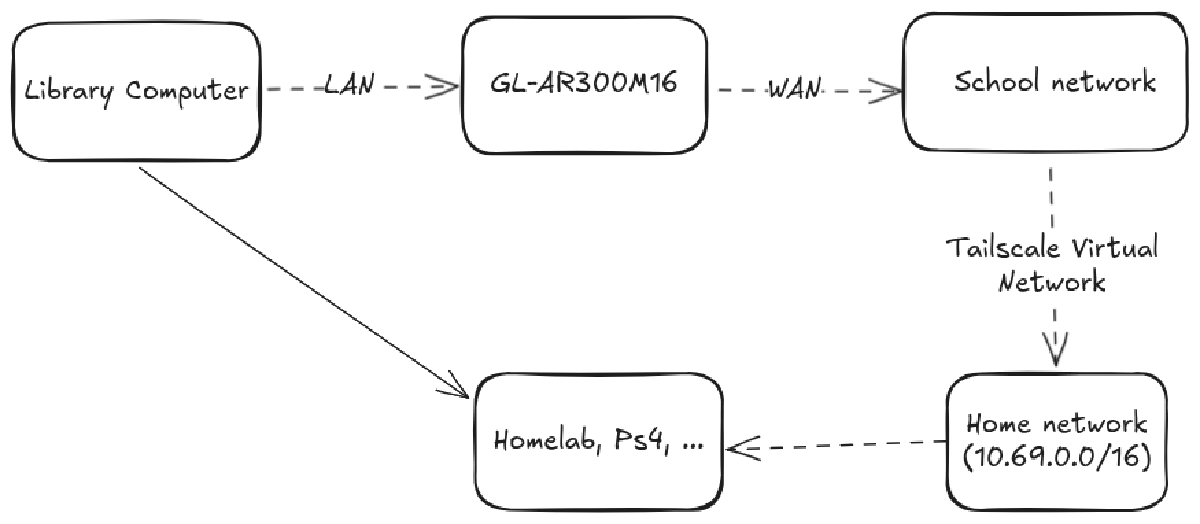
However, there was still one big problem: I couldn’t access the resources that I host with my homelab, so I still couldn’t 100% replicate the network side of my home laptop. Previously, even if I was at school, I could connect via Tailscale to my home router running OpenWRT that advertises a subnet route of 10.69.0.0/16, so I could still access those addresses without having to physically be there. Because the public computer can’t install any programs, it can’t install Tailscale. But I saw there was a LAN cable connected to it, so I thought maybe I could buy some old router that could also run OpenWRT to hijack the school’s internet. Enter the GL.iNet Travel Router.
This post is the story of how I turned a tiny, $10 travel router into a powerful networking tool that gave me full, secure access to my entire homelab from a locked-down public computer.

The plan#
After a long consideration and research, I settled on the GL-AR300M16. It was a tiny, cute little router that was actually (not so much) powerful. It’s specs were:
- 100 Mbps Ethernet ports
- 16MB NOR ROM flash (The problem child)
- 128MB RAM (The lifesaver)
- Two configurable WAN/LAN ports
My goal was to “insert” my own router between the school’s network and the public computer. The computer wouldn’t know the difference, but all its traffic would first go through my device, which would be running Tailscale. That way, I could fool the school into thinking I was connected via the school network, but I was actually routing all my packets to my home router. Here’s the data flow:

The price was really affordable too, only 33 bucks. But as a cheap-ass kid, I was looking to buy something old and used on eBay. Even more surprising, I actually found one that was new/in an unopened box and listed for bidding at 5 bucks. After staying up all night to watch the bid, I successfully got it for 10 + 8 bucks for shipping.

Firmware reinstallation#
After I received the package, the first thing I wanted to do was to uninstall the stock firmware and install the original OpenWRT to free up some space. I don’t hold any hatred toward the stock firmware, but with the router only having 16MB of ROM storage, and the firmware size being 15 MB, that left me with less than 1MB to do anything. So, no.
Searching the internet, I found this site to download the clean version firmware of the router. But when I installed it, it only had OpenWRT version 17, which was so outdated that I couldn’t even update the packages properly because the SSL was no longer working. So I hit the internet again to find a guide and, luckily again, I even found the original OpenWRT guide dedicated to this machine.
The suggested way of installing OpenWrt on the GL-AR300M is using the u-boot bootloader. It can be accessed by holding the reset button, powering the device and waiting for 5 flashes of the LED. Instructions on how to access u-boot can also be found in the debricking instructions: https://docs.gl-inet.com/en/3/tutorials/debrick/.
Then one can release the button, and access u-boot on http://192.168.1.1 which requires a PC with a static IP of 192.168.1.2 and netmask 255.255.255.0 .
Assuming your u-boot is working correctly:
- boot into u-boot (debrick mode) by holding the reset button, powering the device and waiting for the led to flash 5 times.
- Browse to
[http://192.168.1.1](http://192.168.1.1/ "http://192.168.1.1")- Upload glinet_gl-ar300m-nand-initramfs-kernel.bin file to router
- Wait for it to reboot
- Telnet to 192.168.1.1 and set a root password, or browse to
http://192.168.1.1if LuCI is installed.You will notice that the router is running in safemode. In order to leave it, one must now flash a regular image factory or sysupgrade (e.g. glinet_gl-ar300m-nand-squashfs-factory.img) from shell or luci. After this second flash, the router will boot normally.
The only thing I needed to adjust to access u-boot was that I needed to unplug all the external antennas and the WAN port, leaving only the LAN cable connected to it. Also, I needed to remember to download two files: one initramfs-kernel.bin file for the initial u-boot installation, and the other squashfs-sysupgrade.bin for the sysupgrade installation afterward.
Also, as I’ll explain later in this article, I was stuck with the issue of Tailscale not working without iptables because OpenWRT decided to use nftables in OpenWRT 22.04 and later. So I needed to install the 21.02 version. Here are the links to the two firmware files:
openwrt-21.02.0-ath79-generic-glinet_gl-ar300m16-initramfs-kernel.bin(for the initial u-boot flash)openwrt-21.02.0-ath79-generic-glinet_gl-ar300m16-squashfs-sysupgrade.bin(for the real installation afterward).

Install Tailscale#
Now for the fun part. I found and tried using this repo but realized the device only had 16MB of NOR ROM, of which 6MB had already been reserved for the firmware. So when I ran the script, it warned me I didn’t have enough storage, as it required 15MB.
Therefore, I decided to follow this repo. Instead of relying on the 16MB NOR ROM storage, it stored the tailscaled and tailscale binaries in /tmp (i.e., the 128 MB RAM) instead. But it still stored the init daemon (which is used for downloading those binaries every time the router boots up) and the state file to keep the login and authentication persistent.
However, with that said, I still had to downgrade the Tailscale version and remove the “fetch latest release” logic in the usr/bin/tailscale and usr/bin/tailscaled files because the latest version also didn’t fit in the available RAM.
	tailscale_version="1.36.1"
    # latest_version=`wget -O- https://pkgs.tailscale.com/stable/ | grep tailscale_ | head -1 | cut -d'_' -f 2`
    # if [ "$tailscale_version" != "$latest_version" ]; then
    #    tailscale_version=$latest_version
    #fi
For Tailscale versions before 1.58.2-1, the init script may need to be modified to force Tailscale to assign an IP to the tailscale0 interface. So I had to modify the init daemon at /etc/init.d/tailscale. After the last procd_append_param, I added: procd_append_param command --tun tailscale0
As mentioned previously, Tailscale has trouble running on OpenWRT version 22.04 and later. I tried to follow this guide to fix it, but no luck, so I decided to reinstall firmware 21.02 again.
wgengine.NewUserspaceEngine(tun "tailscale0") error: router.Up: setting netfilter mode: exec: "iptables": executable file not found in $PATH
flushing log.
logger closing down
getLocalBackend error: createEngine: router.Up: setting netfilter mode: exec: "iptables": executable file not found in $PATH
After the re-installation and following the exact guide above, I was finally able to authenticate with Tailscale on the router.
root@OpenWrt:~# /etc/init.d/tailscale start
root@OpenWrt:~# tailscale up

To authenticate, visit:

	https://login.tailscale.com/a/d7ec72e01e7d4

Success.
Some peers are advertising routes but --accept-routes is false

# Reboot the machine

root@OpenWrt:~# tailscale status
Downloading Tailscale 1.36.1_mips ..
Downloading 'https://pkgs.tailscale.com/stable/tailscale_1.36.1_mips.tgz'
Connecting to 199.38.181.239:443
Writing to stdout
tailscale_1.36.1_mips/tailscale
-                    100% |*******************************| 20505k  0:00:00 ETA
Download completed (20997485 bytes)
Done!
100.98.192.109  openwrt-1            mrphuc26032006@ linux   -
100.121.251.90  archlinux            mrphuc26032006@ linux   offline
100.72.74.109   ipad161              mrphuc26032006@ iOS     offline
100.111.147.16  iphone-13            mrphuc26032006@ iOS     offline
100.110.49.37   openwrt              mrphuc26032006@ linux   idle; offers exit node
100.68.207.111  racknerd-e54f406     mrphuc26032006@ linux   idle; offers exit node
The next step was to route all the traffic that connects to this router to my home network. This was easily done by following this guide.
Create a new unmanaged interface via LuCI: Network → Interfaces → Add new interface
- Name: tailscale
- Protocol: Unmanaged
- Device: tailscale0
Create a new firewall zone via LuCI: Network → Firewall → Zones → Add
- Name: tailscale
- Input: ACCEPT (default)
- Output: ACCEPT (default)
- Forward: ACCEPT
- Masquerading: on
- MSS Clamping: on
- Covered networks: tailscale
- Allow forward to destination zones: Select your LAN (and/or other internal zones or WAN if you plan on using this device as an exit node)
- Allow forward from source zones: Select your LAN (and/or other internal zones or leave it blank if you do not want to route LAN traffic to other tailscale hosts)
Click Save & Apply
(Optional) Connect to WPA2-EAP network such as eduroam#
Although my router has 2 WAN/LAN ports, it also has the capability to act as a WiFi repeater. This can be extremely useful if I’m wandering around the school and can’t find any LAN ports on the wall; I can still connect to the eduroam network and advertise it back to my phone or tablet to access my home network.
However, eduroam is kinda tricky to set up, even on a computer client. Lucky me again, I found this guide to help me set it up. Albeit, I had to install the wpad-wolfssl package instead of wpad, since I was using wolfssl as a backend service. The normal wpad package didn’t allow me to verify the SSL certificate after connecting to it.
“eduroam” is a
WWPA2-EAPnetwork that allows members of higher education and other institution around the world to use each others WiFi networks with their home credentials. As such, the setup is slightly more complicated than that of other WiFi clients. Especially, thewpadpackage needs to be upgraded:
- Install the full version of
wpad:opkg update; opkg remove wpad-mini; opkg remove wpad-basic; opkg install wpad; reboot(via SSH, but the web UI works as well).- Click “Scan” on either WiFi interface (but doing this for both seems to create problems with DHCP client) on http://192.168.8.1/cgi-bin/luci/admin/network/wireless, select “Join network” for any “eduroam” connection/AP.
- Select the few possible settings as appropriate, enter anything as password for now, “submit”.
- Under “Wireless Security”, select
WWPA2-EAPas “Encryption”, and set everything else according to your institutions eduroam configuration.
Here’s my school’s configuration:
(Optional) Install NextDNS to have local DNS resolution and Ads Blocking on the go#
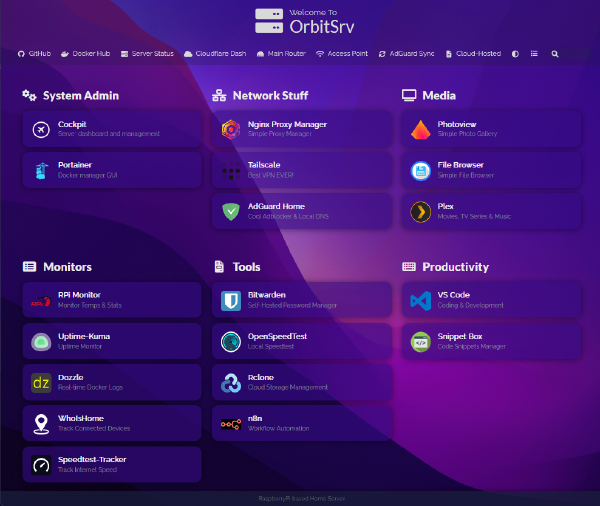
If you want more detail on how I set up NextDNS and Tailscale, you can read it here. But for now, it is my main DNS server to resolve my Kubernetes Traefik resolutions, for ad-blocking services, and for parental controls to limit myself from doom-scrolling too much. Installing it was easier than Tailscale. Just get the NextDNS configuration profile ID, paste it in after you install the package, and you’re good to go.
- Go to System -> Software
- Click the “Update lists” button
- Enter “luci-app-nextdns” in the “Download and install package” field and click “OK”
- Go to Services -> NextDNS and configure NextDNS
Summary#

For $18, even though it’s a weak router, I couldn’t ask more of it. It can run Tailscale, act as a WiFi repeater, and handle NextDNS resolution, and with all of that, it still has 28MB left in RAM. What’s not to like? Definitely a lifesaver at a time when my laptop was broken. Maybe with this, I will begin to prefer going to school to study and code more than staying at home.